Page 1 of 1
Guide for GIMP
Posted: Sat Nov 06, 2010 4:03 pm
by QoH
HI all:
As I am beginning to work on a map, I was wondering if there is a guide for GIMP out there for me to use. I'm only in the drawing stages of the map, so nothing detailed needed yet. But, I was just throwing this idea out there since there may be other GIMP users as well looking for a guide to making neat maps.
COnversely, is GIMP similar enough to Photoshop that I could use the
Guide to Photoshop shown here?
thanks
Re: Guide for GIMP
Posted: Tue Feb 15, 2011 6:11 pm
by sannemanrobinson
I'm not an expert in GIMP but it has a different interface than Photoshop. If you want GIMP with the Photoshop layout, use GIMPshop
Re: Guide for GIMP
Posted: Wed Feb 16, 2011 2:42 am
by natty dread
Ok, I'm going to write a basic outline on how I make maps with GIMP. I'm not going to go into advanced stuff like texture making and stuff, just the basics...
First of all, you'll need a map of the area you're making a map of. Say, you're making a map of france, you can take a ready map of france... good souces are google maps and google in general. It's best to use a map that is of decent size - you can always resize down but upsizing much lowers quality and makes tracing harder.
Next, select the area of the map you are focusing on and crop it. Make the selection so that all the features you want to include in your map are clearly visible in it. Use rectangle selection, then go to image -> crop to selection.
Then, resize this map to the size of the large map. This is normally a maximum of 840 x 800. Go to image -> scale image. If the image is wider than it's tall, set width to 840. Otherwise, set height to 800. The other dimension is automatically scaled relative to the dimension you set.
Now you have the base image which you can start tracing.
Tracing the map is simple: you draw the shape of the land on a new layer. What I do is I create a new layer (empty) and take a paintbrush with a hard circle brush of about 2-3 px. I use black for this, although the colour doesn't matter - if the map you're tracing is very dark, you can use white or some other colour.
Trace all of the land area. Colour all of the land area black on the new layer. If you use paint bucket, it often leaves some pixelation, so you'll need to fix those manually with the paintbrush. When you're done, you should have a layer where all the land is black, and all the sea is transparent.
Next is the bonus areas. Go to the layer you just created, and select Layer > Transparency > Alpha to selection. Now the black area (land area) is selected, create a new layer.
On the new layer, you draw the first bonus area. Use whatever colour, you can easily change the colours later. Don't mess with the selection at any time, the selection ensures that you draw only on the area you have marked as land.
When the bonus area is done, go to Layer > Transparency > Substract from selection. This way, you'll now have all of the land area minus the bonus area you just drew, selected. Then create a new layer and draw the next bonus area. Repeat until all bonus areas are drawn.
When all of the bonus areas are drawn, if there is any selection left, this is probably non-playable land. You can create another layer similar to the bonus areas from this.
Next, you draw borders for the bonus areas. Do this on a new layer. This can be easily done by selecting a bonus area with the Alpha to selection function, then going to the bonus borders layer, and using Edit -> Stroke selection. You can draw them by hand if you wish, but this way is much faster and results in uniform borders.
After the bonus area borders are drawn, create a new layer for territory borders. Now again select the land area from the first land area layer, so you'll ensure your borders won't go "over the lines". Set all other layers non-visible except the original map, and trace the borders of your territories on the new territory border layer. It's best to make them somewhat thinner than the bonus area borders.
Lastly, make a sea layer that goes under the bonus area layers. Fill the sea layer full of sea colour, eg. blue. Turn all the layers over the sea layer visible.
Ta-dah! You have a map. Now all you need is title, legend, territory names, impassables etc.
Re: Guide for GIMP
Posted: Thu Dec 29, 2011 2:49 pm
by Jdsizzleslice
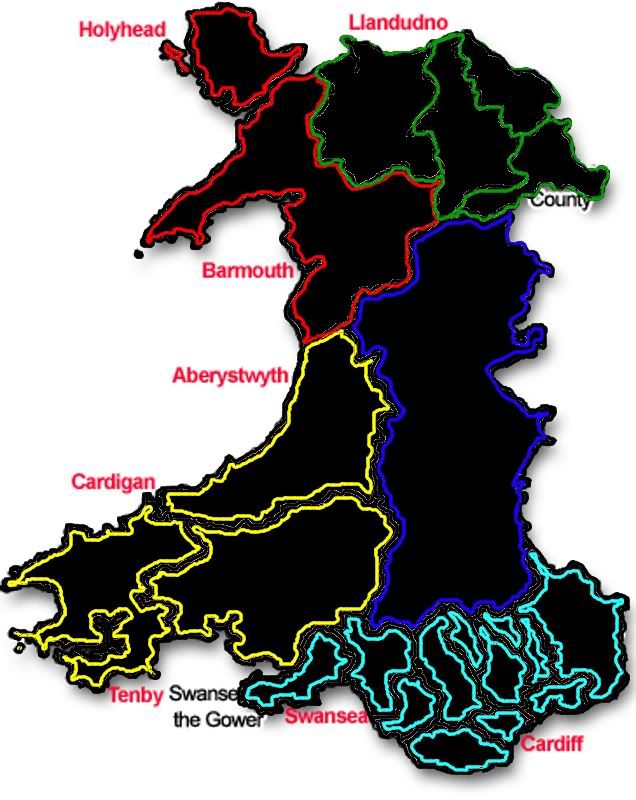
Ok... So tell me if I am doing this right. The map I am trying to create is Wales. And yes, I know a map of Wales has already been created. This is just a test, and I want to see if It works.
- Click image to enlarge.
Re: Guide for GIMP
Posted: Thu Dec 29, 2011 2:54 pm
by natty dread