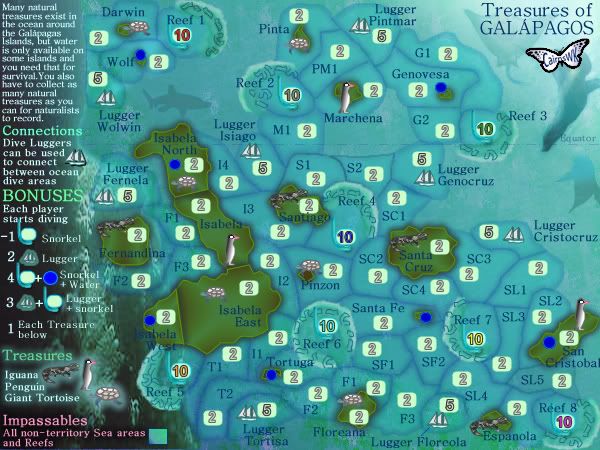
Wow Cairns! The graphics have taken a huge leap forward - they're looking
great! A couple of minor notes:
--the "L" in San Cristobal is sliced in half by at the edge of the map - give it a gentle kick to the west to fix it.
--Lugger Cristocruz could use a slight nudge west to move it away from the map edge, too.
--If there's any way you can sharpen the descriptive text at the top of the legend, that'd be awesome, the rest of the text is readable - that stuff's a bit fuzzy (to me).
--I really like the critter glow in the legend - looks really good.
--Isabela West text disappears into the continental shelf a bit, maybe move it east or lighten the background a bit.
As far as game play, it looks to me like
Reef 1 has a huge advantage
--it's fairly isolated (OK, it's totally isolated...)
--the 1st three territs accessible all come with bonuses
--I'd play for Wolf (4) then Darwin (1) then Lugger Wolwin (3) and have a +8 bonus within a round or two (three with nasty dice

)
Reef 2 looks like an OK starting point
--Marchena (1) is immediately available
--Genovesa (4) and Lugger Pintmar (3) are right at hand, too, but they're going to be hotly contested by the person starting at
Reef 3
Reef 3 isn't quite as good as
Reef 2
--no matter what you do, you're trapped behind a non-bonus territ
--then you get access to Genovesa (4), Lugger Pintmar (3) or Lugger Genocruz (3)
--you're gonna be fighting with
Reef 2 for the first 2 territs.
Reef 4 looks pretty good
--Pinzon (1) to Santa Fe(4), then back to Santiago (1) and Lugger Isiago (3) gets you a good bonus start with minimal player fighting
Reef 5 also looks good
--a run through Isabela Island nets you
+10 bonus with two water territs with limited initial resistance from other players
--if your path does get blocked, you can retrench to F3, F2, Fernandia (1) and Lugger Fernela (3) plus holding Isabela West (4)
Reef 6 isn't looking quite so hot...
--F1 to Tortuga (4)
--<F1|Tortuga> to F2 to Lugger Tortisa (3)
--F1 to Floreana (2)
Reef 7 looks to be the worst spot to start from
--SC3 to Lugger Cristocruz (3) is the best shot for a bonus
--SC3 to Santa Cruz (1) is a smaller bonus option with the same distance
--SL3 to SL2 to San Cristobal (4
and 1??) is a pretty good option, but you'll be fighting
Reef 8 for the privilege, and he's got a shorter path
Reef 8 is OKish...
--Espanola (1) is handy
--SL5 to San Cristobal (5??) has the battle with
Reef 7
--Espanola to Lugger Floreola (3) ? or do you have to go thru SL4 - it's really hard to tell
Sorry, I don't have any advice on fixing/balancing this, I just thought I'd point out what I see and let the gurus help you fix 'em!

FreeMan10