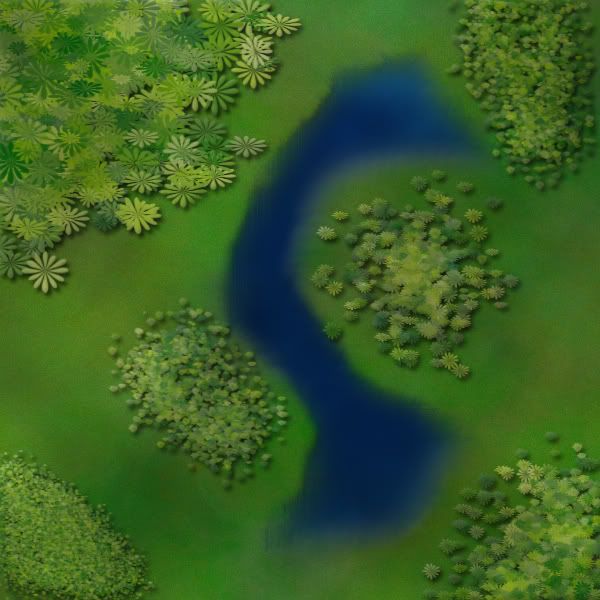
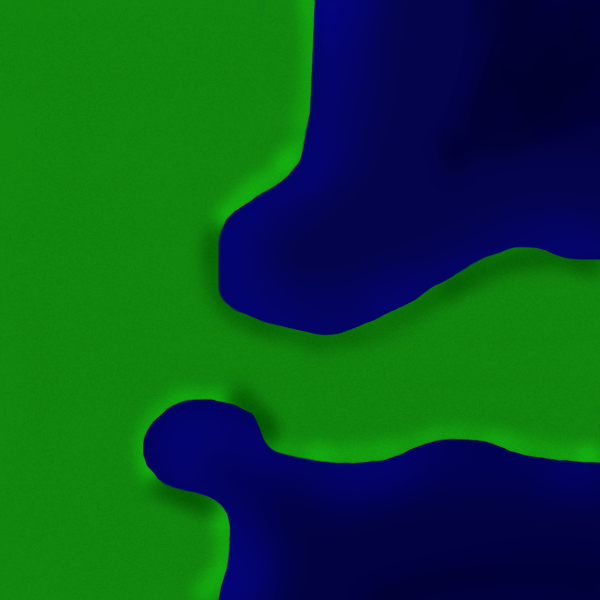
DiM wrote:never underestimate the power of personalized brushes. create a shape of how you think a tree looks from above. let's say a star shape. now take that brush and set the background and foreground to 2 foliage colours (dark green and yellowy green) then do the following:
shape dynamics>
> size jitter 100%
> minimum diameter 0%
> angle jitter 0%
> roundness jitter 68%
> min roundness 25%
scatter> adjust as you please dependng on what you need
colour dynamics>
>fore/back 100%
> saturation 50%
the rest at 0%
and check smoothing.
then go ahead and paint what you need adjusting the brush size according to the height of the viewpoint.
after you paint put on some drop shadow and even bevel if it suits your need. but keep the bevel at a minimum.
here's a quick example. i didn't bother making a custom shape so i used a flower one. it looks rather bad on large trees but it works for small ones as the details are hard to spot.
and here's the file http://www.sendspace.com/file/9g965g
Map-Making TTT (Tips, Tricks & Tutorials)
Moderator: Cartographers
47 posts
• Page 1 of 2 • 1, 2
Re: Q&A: Map Making TTT (Tips, Tricks & Tutorials)
![]() by DiM on Thu May 08, 2008 8:19 am
by DiM on Thu May 08, 2008 8:19 am
Last edited by DiM on Tue May 13, 2008 7:33 am, edited 1 time in total.
“In the beginning God said, the four-dimensional divergence of an antisymmetric, second rank tensor equals zero, and there was light, and it was good. And on the seventh day he rested.”- Michio Kaku
-
 DiM
DiM
- Posts: 10415
- Joined: Wed Feb 14, 2007 6:20 pm
- Location: making maps for scooby snacks


Re: Q&A: Map Making TTT (Tips, Tricks & Tutorials)
![]() by bryguy on Thu May 08, 2008 10:14 am
by bryguy on Thu May 08, 2008 10:14 am
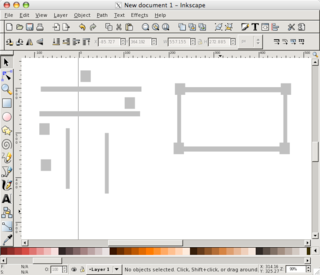
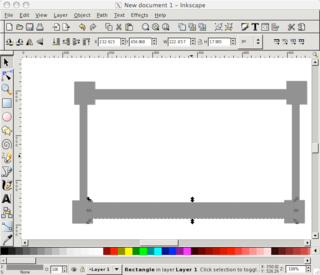
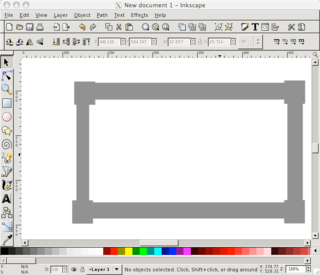
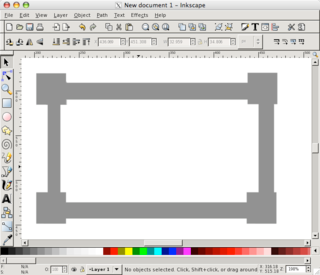
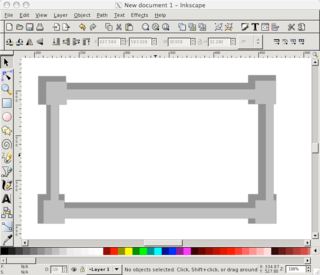
ok i had some free time, and recently i figured out how to make a decent looking landscape with inkscape, ill include a picture i drew up 5 minutes ago at the end.
OK first, open X-11 and Inkscape
Click the Rectangles and Squares tool
Make a box, it can be any size
Choose a color for the box from the color swatch (the thing at the bottom of inkscape that has all the many colors you can use), for this example im using green.
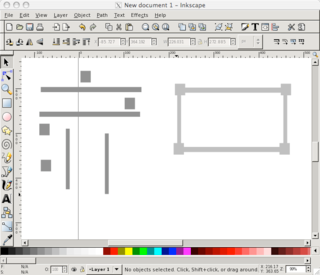
Now using the Freehand tool, carefully draw some water onto the map, and give it a nice looking blue color. (You dont have to create a new layer for this, since Inkscape uses layers inside of layers)
After thats done, decide where your light source will be, for this example im using the lower right corner
Now draw along the coast of the water, just a little on the land and a little in the water
Now if that side is facing towards your light source, fill it with al lighter color than your square (so if your square is green, make what you just made light green) If it is facing away from your light source, make it darker than your square (dark green if your square is green)
Repeat until u have done that for the entire coastline
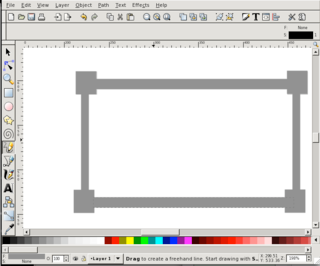
Now if you have done that correct it will look crappy so far. But dont worry, we're gonna fix that.
Click your lightened and darkened areas, and using the lower selection along the top bar, move it until it is under the water, yet still visible on the land. Do that for all the coast
Now it should look a little better, but not all that good, but dont worry this is the final step
Click a lightened or darkened area, and in the upper right corner of inkscape, click the little paintbrush (it will be next to a T)
Now once u have clicked that, using the sliding bar that is under Blur, modify the blur until it looks good (i use about 12.5%)
Now repeat that for each of the lightened/darkened areas, and if u did it right, it should look something like this:
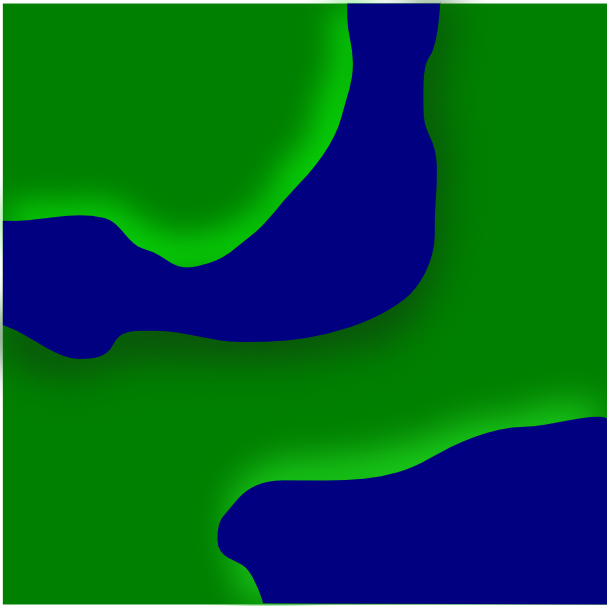
hope thats not to confusing
OK first, open X-11 and Inkscape
Click the Rectangles and Squares tool
Make a box, it can be any size
Choose a color for the box from the color swatch (the thing at the bottom of inkscape that has all the many colors you can use), for this example im using green.
Now using the Freehand tool, carefully draw some water onto the map, and give it a nice looking blue color. (You dont have to create a new layer for this, since Inkscape uses layers inside of layers)
After thats done, decide where your light source will be, for this example im using the lower right corner
Now draw along the coast of the water, just a little on the land and a little in the water
Now if that side is facing towards your light source, fill it with al lighter color than your square (so if your square is green, make what you just made light green) If it is facing away from your light source, make it darker than your square (dark green if your square is green)
Repeat until u have done that for the entire coastline
Now if you have done that correct it will look crappy so far. But dont worry, we're gonna fix that.
Click your lightened and darkened areas, and using the lower selection along the top bar, move it until it is under the water, yet still visible on the land. Do that for all the coast
Now it should look a little better, but not all that good, but dont worry this is the final step
Click a lightened or darkened area, and in the upper right corner of inkscape, click the little paintbrush (it will be next to a T)
Now once u have clicked that, using the sliding bar that is under Blur, modify the blur until it looks good (i use about 12.5%)
Now repeat that for each of the lightened/darkened areas, and if u did it right, it should look something like this:
hope thats not to confusing
-
bryguy
- Posts: 4381
- Joined: Tue Aug 07, 2007 8:50 am
- Location: Lost in a Jigsaw


Re: Q&A: Map Making TTT (Tips, Tricks & Tutorials)
![]() by bryguy on Thu May 08, 2008 10:43 am
by bryguy on Thu May 08, 2008 10:43 am
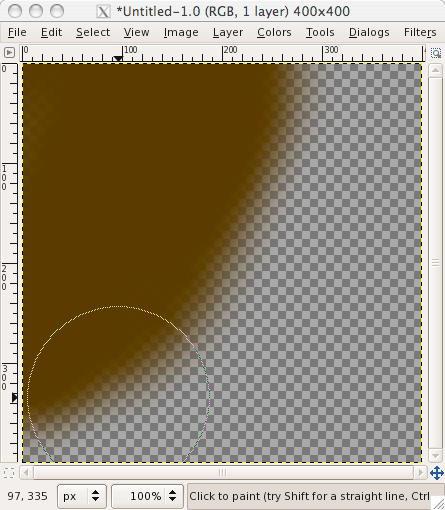
OK same landscaping thing as before, but in the GIMP this time 
OK open GIMP
Create a new image, im using 600x600 for this one
Click the Paintbrush tool, choose a nice color (green again this time) and fill the whole picture with it (or if your lazy just use the Bucket Fill tool)
Now create a new layer, and on this layer, draw some water, i suggest using a large brush to get the basic area, and then zooming in to 400% or more and using a smaller brush and smoothing it out
Once thats done, choose your light source (lower right corner again here)
Now create a layer BELOW the water layer, but above the grass layer
Now choose wether your gonna start with the areas getting hit by light, or in the shadows.
Once you've chosen, if u chose the shadowed area, then grab the Airbrush tool and set the color on it to black or dark green. Then select a Circle Fuzzy Airbrush and change the pressure to 10, and the rate to 88. Now start coloring along the shore parts that are facing AWAY from your light source.
Once done, if u chose your grass color to be green, then keep the same airbrush, but change the color to light green. And then do the same thing that u did for the shadowed areas, but do it to the areas facing TOWARDS the light source.
Now if u did it right, it should look something like this:
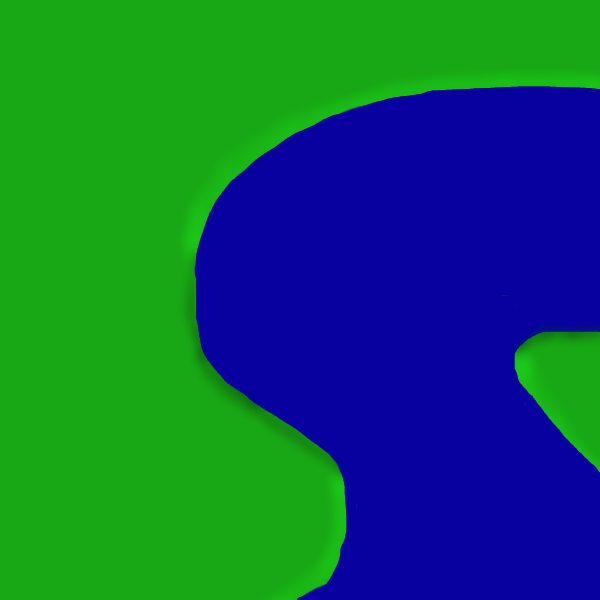
Remember, i spent like 5 minutes drawing this, so if u work at it longer u could get better looking results
Also, for airbrush sizes, i suggest using:
Circle Fuzzy (19)
and on the scale bar, move it up to 2.21
Hope this helps
OK open GIMP
Create a new image, im using 600x600 for this one
Click the Paintbrush tool, choose a nice color (green again this time) and fill the whole picture with it (or if your lazy just use the Bucket Fill tool)
Now create a new layer, and on this layer, draw some water, i suggest using a large brush to get the basic area, and then zooming in to 400% or more and using a smaller brush and smoothing it out
Once thats done, choose your light source (lower right corner again here)
Now create a layer BELOW the water layer, but above the grass layer
Now choose wether your gonna start with the areas getting hit by light, or in the shadows.
Once you've chosen, if u chose the shadowed area, then grab the Airbrush tool and set the color on it to black or dark green. Then select a Circle Fuzzy Airbrush and change the pressure to 10, and the rate to 88. Now start coloring along the shore parts that are facing AWAY from your light source.
Once done, if u chose your grass color to be green, then keep the same airbrush, but change the color to light green. And then do the same thing that u did for the shadowed areas, but do it to the areas facing TOWARDS the light source.
Now if u did it right, it should look something like this:
Remember, i spent like 5 minutes drawing this, so if u work at it longer u could get better looking results
Also, for airbrush sizes, i suggest using:
Circle Fuzzy (19)
and on the scale bar, move it up to 2.21
Hope this helps
-
bryguy
- Posts: 4381
- Joined: Tue Aug 07, 2007 8:50 am
- Location: Lost in a Jigsaw
Re: Q&A: Map Making TTT (Tips, Tricks & Tutorials)
![]() by bryguy on Fri May 09, 2008 3:25 pm
by bryguy on Fri May 09, 2008 3:25 pm
ok, with some toying and messing around, i have figured out....
How to make a O.K. looking fantasy world/map using both GIMP & Inkscape
Note: You will want to save a bit, cause for some reason (at least for me) every once in a while X-11 will crash, taking all your unsaved work with it. And save it as a .xcf, or .psd
Note 2: Sometimes X-11 is called XQuartz
Note 3: You must have Inkscape and GIMP for this
Part 1, making the land:
Part 2, Adding Castles:
Part 3, adding a desert (optional):
Part 4, adding food resources (optional):
Part 5, adding signs of life:
Part 6, Adding hills (optional, although i mostly suggest u skip this step):
Part 7, How to make a village:
Part 8, making a mountain (optional, but good to learn)
Part 9, converting it into a map:
Part 10, coming up with bonuses/unique gameplay:
If done correctly, you should have something like this:

I hope you enjoyed my tutorial, and congratz if u made it all the way through


also, here my file if u want it:
XCF:
http://www.fileden.com/files/2008/5/13/ ... xample.xcf
PSD:
http://www.fileden.com/files/2008/5/13/ ... xample.psd
How to make a O.K. looking fantasy world/map using both GIMP & Inkscape
Note: You will want to save a bit, cause for some reason (at least for me) every once in a while X-11 will crash, taking all your unsaved work with it. And save it as a .xcf, or .psd
Note 2: Sometimes X-11 is called XQuartz
Note 3: You must have Inkscape and GIMP for this
Part 1, making the land:
Part 2, Adding Castles:


Part 3, adding a desert (optional):
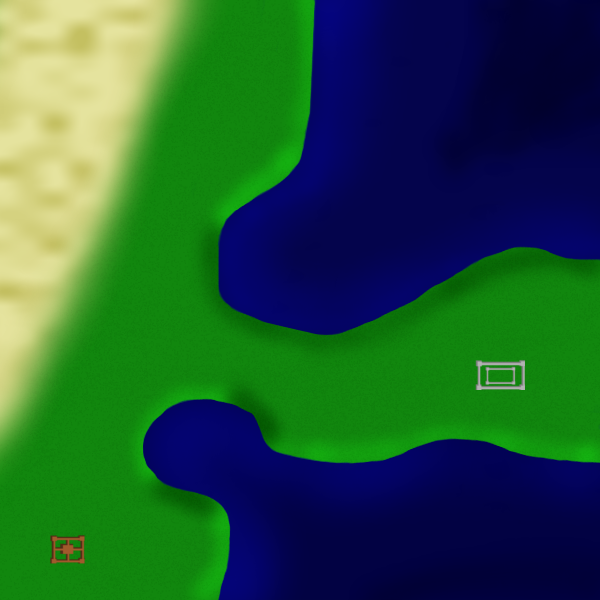
Part 4, adding food resources (optional):

Part 5, adding signs of life:

Part 6, Adding hills (optional, although i mostly suggest u skip this step):
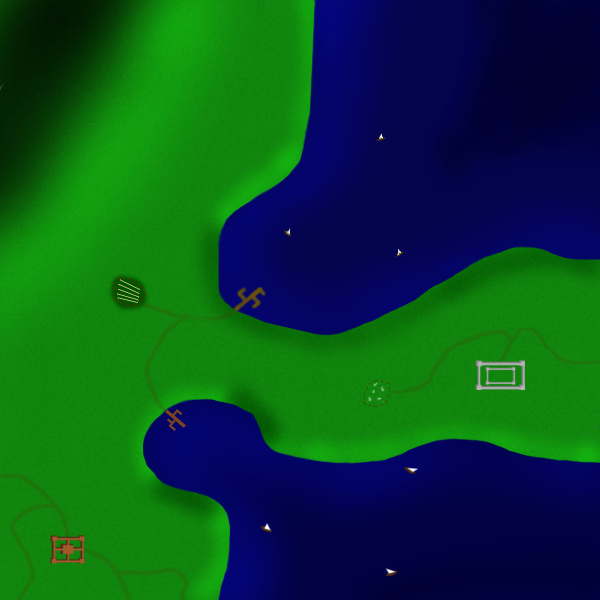
Part 7, How to make a village:
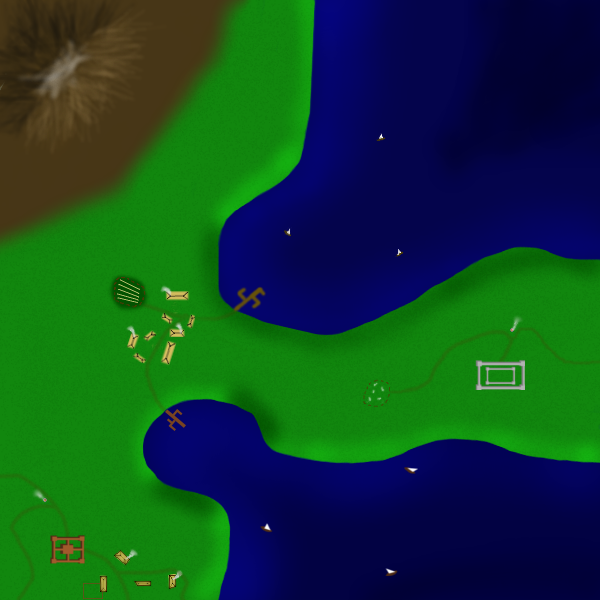
Part 8, making a mountain (optional, but good to learn)

Part 9, converting it into a map:
Part 10, coming up with bonuses/unique gameplay:
If done correctly, you should have something like this:
I hope you enjoyed my tutorial, and congratz if u made it all the way through
also, here my file if u want it:
XCF:
http://www.fileden.com/files/2008/5/13/ ... xample.xcf
PSD:
http://www.fileden.com/files/2008/5/13/ ... xample.psd
Last edited by MrBenn on Tue Dec 30, 2008 4:00 pm, edited 10 times in total.
Reason: Added Spoilers
Reason: Added Spoilers
-
bryguy
- Posts: 4381
- Joined: Tue Aug 07, 2007 8:50 am
- Location: Lost in a Jigsaw
my borders (mini tut)
![]() by Lone.prophet on Mon May 12, 2008 8:53 am
by Lone.prophet on Mon May 12, 2008 8:53 am
ok gimil asked me how i did the gulfs border wel here is a minitut
1, i made the continents in illustrator
2, i make all borders in illustrator ( i think its a 2 pixel brush thoough it could be something in close)

back in photoshop:
3, i give the border a outer glow of white with noise set on overlay
4, i do an apply image blur it a couple of times and set the layer to darken
hope you liked it and learned something
1, i made the continents in illustrator
2, i make all borders in illustrator ( i think its a 2 pixel brush thoough it could be something in close)
back in photoshop:
3, i give the border a outer glow of white with noise set on overlay
4, i do an apply image blur it a couple of times and set the layer to darken
hope you liked it and learned something
Last edited by Lone.prophet on Mon May 12, 2008 10:29 am, edited 1 time in total.
-
Lone.prophet
- Posts: 1467
- Joined: Thu Oct 12, 2006 4:37 pm
- Location: Your basement Muahaha


Re: my borders (mini tut)
![]() by RjBeals on Mon May 12, 2008 1:58 pm
by RjBeals on Mon May 12, 2008 1:58 pm
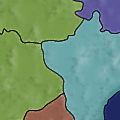
Sure it's not the most efficient way, but I really like the look of your borders Lone.prophet. It just must be hard to make adjustments on the fly.
-

RjBeals
- Posts: 2506
- Joined: Mon Nov 20, 2006 5:17 pm
- Location: South Carolina, USA


Re: Q&A: Map Making TTT (Tips, Tricks & Tutorials)
![]() by bryguy on Tue May 13, 2008 1:56 pm
by bryguy on Tue May 13, 2008 1:56 pm
How to create custom GIMP brushes
ok with my last tutorial finished, i have time to create this tutorial on how to make custom brushes.
First, create a new image, with any size settings
Draw what you want your brush to look like
Do the following:
File: Save
but u have to go through the following folders to get it as a brush, do this:
Find the GIMP application folder
Now to find the right folder, heres what folders to go through in order:
Contents
Resources
Share
Gimp
2.something
Brushes
And save it as a .gbr
now you should have your own custom brush
-
bryguy
- Posts: 4381
- Joined: Tue Aug 07, 2007 8:50 am
- Location: Lost in a Jigsaw
Re: Q&A: Map Making TTT (Tips, Tricks & Tutorials)
![]() by bryguy on Thu May 15, 2008 7:33 am
by bryguy on Thu May 15, 2008 7:33 am
ok took me forever to find anything for this, but:
Adding font to GIMP 2.X (X being any number)
OK i found this on the internet, and here is the original link: http://raygunrobot.com/archives/The-eas ... -with-GIMP
But unless u dont want to scroll through what that guy has to say, im gonna put it in short:
First, know where your fonts that are used in places like Word are
Bring up GIMP
Go under File: Preferences
Scroll down all the way to the one that says Folders, and click the little triangle next to it
Now scroll down to Fonts
Once thats chosen, click the little image that looks like a page with a corner bent
Now it will have a little area for u to right where u want it to get some more fonts from, click the Folder button
Now a window will come up, now work go through your files to your folder were your fonts are kept throughout your computer
Hit ok
Then hit the ok in the bottom right corner
Restart GIMP
There ya have it! no more trouble with getting fonts that you really want in to GIMP!
-
bryguy
- Posts: 4381
- Joined: Tue Aug 07, 2007 8:50 am
- Location: Lost in a Jigsaw
Re: Q&A: Map Making TTT (Tips, Tricks & Tutorials)
![]() by DiM on Sun Jun 08, 2008 5:33 am
by DiM on Sun Jun 08, 2008 5:33 am
Last edited by MrBenn on Wed Jan 21, 2009 3:09 pm, edited 1 time in total.
Reason: Added spoiler
Reason: Added spoiler
“In the beginning God said, the four-dimensional divergence of an antisymmetric, second rank tensor equals zero, and there was light, and it was good. And on the seventh day he rested.”- Michio Kaku
-
DiM
- Posts: 10415
- Joined: Wed Feb 14, 2007 6:20 pm
- Location: making maps for scooby snacks
Re: Map-Making TTT (Tips, Tricks & Tutorials)
![]() by MrBenn on Tue Dec 30, 2008 3:57 pm
by MrBenn on Tue Dec 30, 2008 3:57 pm
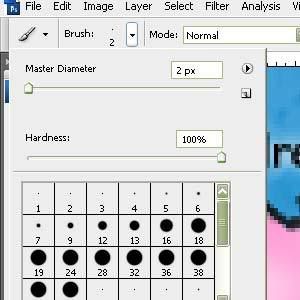
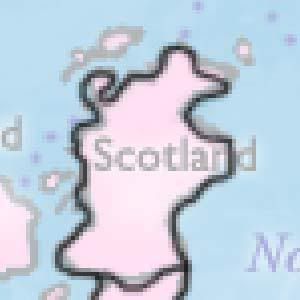
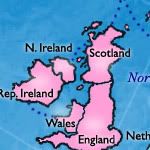
RjBeals wrote:MrBenn wrote:I want to redraw the territory borders, as I want them to look fresh and crisp. At the moment I think they look a bit jaggedy and distorted (as well as inaccurate in 1 or 2 places like N Ireland).... I think this will be a major major task, as my couple of attempts at redoing the border have taken ages, and not been overly successful... Any suggestions on how to do this quickly, easily and efficiently would be warmly received.
I like to use a solid black 2-pixel brush with a hardness of 100% (Opacity 100% & Flow 100%). This gives a good well defined smooth border. I will sometimes outline the entire bonus region in a 3 or 4 pixel brush also, just to keep it separated even more. Zoom in close on your original map and trace the borders. Yes it will take a while, but most likely not as long as you think. How accurate you keep it is up to you.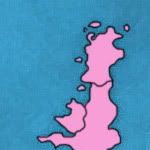

PB: 2661 | He's blue... If he were green he would die | No mod would be stupid enough to do that
-

MrBenn
- Posts: 6880
- Joined: Wed Nov 21, 2007 9:32 am
- Location: Off Duty


Re: Map-Making TTT (Tips, Tricks & Tutorials)
![]() by MrBenn on Tue Jan 06, 2009 9:29 pm
by MrBenn on Tue Jan 06, 2009 9:29 pm
Subject: Route 66, ver 3 pg 2
WidowMakers wrote:
I just use this method because you get the smooth look and the stokes are editable in realtime.
And even if you don't use it or think it is appropriate for this project that is OK.
It is just another way to do the same thing and I just wanted to share it with everyone.
http://www.fileden.com/files/2007/6/15/ ... trokes.psd

PB: 2661 | He's blue... If he were green he would die | No mod would be stupid enough to do that
-
MrBenn
- Posts: 6880
- Joined: Wed Nov 21, 2007 9:32 am
- Location: Off Duty
Re: Map-Making TTT (Tips, Tricks & Tutorials)
![]() by MrBenn on Wed Jan 21, 2009 10:30 pm
by MrBenn on Wed Jan 21, 2009 10:30 pm
ZeakCytho wrote:I've been messing around with some mountain drawing on Photoshop trying to make mountains similar to your Wales map, but can't seem to get it right. Could you tell me how you did them?
...I ended up practicing drawing single mountains, much larger than I thought I'd need - there are lots of ways to give the appearance of depth by adding shading or curved lines to your peak...

There is a way of converting these into brushes in PS (I think you can do it in other programs too, but not sure how)... you need to make sure that you've got a transparent background, and that you have your mountain selected. I think there's a Define Brush command on the Edit menu... that will add the drawing as a new brush to the end of your list of brushes...
The difficulty I had with drawing the mountains so large, was that the lines ended up being too thin when I rescaled...
I ended up starting a new image, 50x50px, and then drawing the mountain in there at the size I was going to use it on the map... but I zoomed in massively before drawing it, to get a more accurate drawing with the mouse - the bonus of doing it this way is that the thickest edge of the mountain is the same size as my territory borders, so I could get them to blend seamlessly!
I must have had hundreds of attempts at drawing small mountains before settling on this one.

It was then simply a matter of using the brush to draw a mountain wherever I wanted one! I filled in some of the gaps, by drawing a mountain somewhere near where it needed to go, and deleting some of the 'arm' to make it fit (and give perception of depth). All I did then, was select it with the lasso tool, and drag it into place - with lots of undoing and redoing in between!
Hope this helps
MrBenn
PB: 2661 | He's blue... If he were green he would die | No mod would be stupid enough to do that
-
MrBenn
- Posts: 6880
- Joined: Wed Nov 21, 2007 9:32 am
- Location: Off Duty
Re: Map-Making TTT (Tips, Tricks & Tutorials)
![]() by bryguy on Thu Jan 22, 2009 10:27 pm
by bryguy on Thu Jan 22, 2009 10:27 pm
Whoah, its been forever since I posted in here...
oh well, I had a thought and I thought I would share it
Borders in Gimp
Okay I dont know if any of you GIMP users have ever noticed this, but in GIMP, it is especially hard to make good, smooth borders. The paintbrush tool, with the default brush, makes smooth lines. But as soon as you try a small 1 px brush, it gets all pixely. You could try the Circle Fuzzy (03), except that random intervals it will turn out pixely or have a small bump. If u want, u could always try the airbrush tool, but idk why in the world you would do that, as it usually has lower opacity.
The third (or fourth if u prefer) option is the pen tool. I dont know how many of you have ever used it, but if you have, you may think Im crazy. If you havent, go ahead and try it. Draw fast at first, and then try sloooooooowing doing.
See why u might think Im crazy? The pen tool in its default mode is inconsistent. Draw fast, you get a thinner line. Draw slow, you get a really big and thick line. How in the world would you get the borders all drawn at the same speed?
Well, luckily, you dont have to. Bring up the pen tool. You should see (on the toolbox window) a lot of different sliders. Theres size, angle, size again, tilt speed, etc. Right now we are going to focus on the second size, and the speed, both of which are under the second header, named Sensitivity.
To get the brush to come at the same size, no matter what the speed, you have to adjust the Speed to 0. That tells GIMP to not adjust the size of the pen by what speed your going. Now try drawing a line. Go slow, then fast, then slow. It should all be the same size. If u want, u can change the size (under the sensitivity header) to 0. That makes the pen tool its actual size. Now, when u adjust the size under the Adjustmant header, it will be its rightful size.
Now to draw your borders, just zoom in a bunch, 400%+, and draw your lines quickly. Otherwise your hand gets all jittery and your borders get lots of little bumps.
I hope that helps for next time your creating borders in GIMP
-
bryguy
- Posts: 4381
- Joined: Tue Aug 07, 2007 8:50 am
- Location: Lost in a Jigsaw
Re: Map-Making TTT (Tips, Tricks & Tutorials)
![]() by the.killing.44 on Fri Jan 30, 2009 10:19 pm
by the.killing.44 on Fri Jan 30, 2009 10:19 pm

-
the.killing.44
- Posts: 4724
- Joined: Thu Oct 23, 2008 7:43 pm
- Location: now tell me what got two gums and knows how to spit rhymes


Re: Map-Making TTT (Tips, Tricks & Tutorials)
![]() by the.killing.44 on Sun Feb 01, 2009 9:59 pm
by the.killing.44 on Sun Feb 01, 2009 9:59 pm
Another one from Rj:
Topic: Map Tutorial: Add grunge to bring maps to life
.44
Topic: Map Tutorial: Add grunge to bring maps to life
RjBeals wrote:I think a lot of people can draw shapes to make a map, but they are lacking those tricks of how to take the map to the next graphic level. To give it that something extra. I like to use grunge overlays on my maps to give them a gritty natural feel. Here's how I do it (I use photoshop CS3, but the technique can be used in other software as well).
First do a google search for GRUNGE or better yet, a DeviantART search. I did, and found this on the first page of results:
At this point, you should have the map drawn. This simple map has a border layer and a land layer. The ocean was the background layer.
Here I've added 2 grunge layers. One for the land, and one for the ocean. For the land, I added a layer mask to mask out just the land. Check out the blending settings also. Experiment with different styles - depending on the hue of your land, the settings will have different results.
Then add some layer styles to give the map some flare.
And you end up with this. The grunge layer is not overwhelming. Just enough to make the map a little more realistic.
Good Luck!
[DOWNLOAD ZIPPED PSD HERE]
http://www.rjbeals.com/files/grunge/grunge-00.zip


.44
-
the.killing.44
- Posts: 4724
- Joined: Thu Oct 23, 2008 7:43 pm
- Location: now tell me what got two gums and knows how to spit rhymes
Re: Map-Making TTT (Tips, Tricks & Tutorials)
![]() by the.killing.44 on Sun Feb 22, 2009 8:31 pm
by the.killing.44 on Sun Feb 22, 2009 8:31 pm
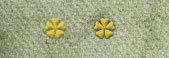
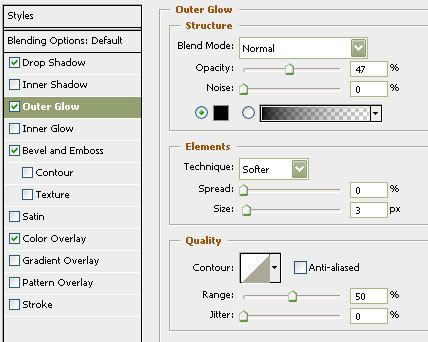
RjBeals wrote:try a little black outer glow. It does wonders to make the icons stand out. See image below. The only difference between the right from left is outer glow.
Again, courtesy of Rj
.44
-
the.killing.44
- Posts: 4724
- Joined: Thu Oct 23, 2008 7:43 pm
- Location: now tell me what got two gums and knows how to spit rhymes
Re: Map-Making TTT (Tips, Tricks & Tutorials)
![]() by LED ZEPPELINER on Mon Feb 23, 2009 10:04 pm
by LED ZEPPELINER on Mon Feb 23, 2009 10:04 pm
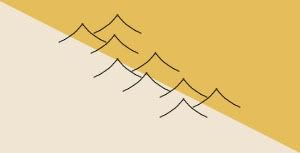
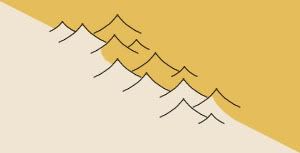
RjBeals wrote:This tutorial is not what I intended - but I'll post it anyway. These mountains sort of came
out abstract and sort of water-color painting style. But I'll post my screenshots and psd
anyway. I just sort of created these as I went.
I started with a background layer. I added a new layer and drew a curved line.
I duplicated that layer, then flipped horizontal, then positioned to make the mountain.
Then I duplicated that layer 9 times, and positioned those mountains so...
Then I added a few smaller mountains.
Then I adjusted the background colors so they were not a hard edge.
Normally a map wouldn't have a hard diagonal line for a border. Also, I didn't add the actual
border along the colors. I forgot, so it looks a little strange with the mountain borders.
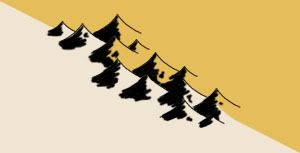
So here I took a 4 or 5 pixel brush and just painted black along the sides of the mountains.
I was being a little quick with my strokes so it would look a little natural. I actually like them
at this point. It looks like a pen and ink style map. Maybe in the Japanese tradition. (New Layer)
And.. looking back, I didn't need to adjust those backgrounds pattern, cause the black covered them anyway.
But instead I added a color to that layer. A brownish color, which is meant to blend into the
color scheme of those 2 map background colors.
I also did something similar to add highlights. This is another new layer. I dropped the opacity also.
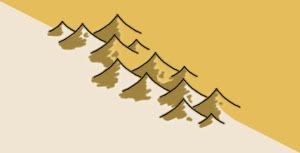
Okay here's where things take a turn. I didn't like the hard borders so I hid the border layer.
The mountains looked okay without. But I wanted them to blend into the map more, so I used
the smudge tool. I just smudged all the edges down to give the effect you see below.
I also added another black shadow layer, which was just a thick brush along the shadow side
of the mountains, lots of gaussian blur, blend as overlay, and opacity real low - like 10 or 20.
Of course, to give it something special I added the grungy overlay to the whole thing.
I'm noticing that many of the newer maps in production have this effect, and they are
looking A+! Anyway - here's what I came up with. Not necessarily great for CC maps, but kind
of cool nevertheless.
Here's the file (zipped PSD CS3): http://www.rjbeals.com/files/mount-rjb.zip


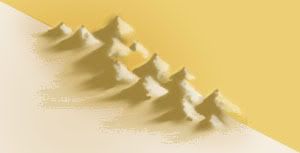
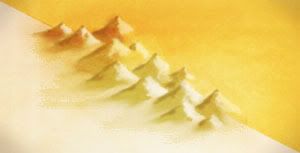

Rj again
-
LED ZEPPELINER
- Posts: 1088
- Joined: Tue Nov 25, 2008 10:09 pm
Re: Map-Making TTT (Tips, Tricks & Tutorials)
![]() by captainwalrus on Sun Jun 21, 2009 11:32 am
by captainwalrus on Sun Jun 21, 2009 11:32 am
does anyone have a good tutorial for mountains in GIMP?
-
captainwalrus
- Posts: 1018
- Joined: Sun Nov 11, 2007 3:19 pm
- Location: Finnmark


Re: Map-Making TTT (Tips, Tricks & Tutorials)
![]() by ManBungalow on Sun Jun 21, 2009 11:35 am
by ManBungalow on Sun Jun 21, 2009 11:35 am
captainwalrus wrote:does anyone have a good tutorial for mountains in GIMP?
I was about to ask the same question.

-
ManBungalow
- Posts: 3431
- Joined: Sun Jan 13, 2008 7:02 am
- Location: On a giant rock orbiting a star somewhere


Re: Map-Making TTT (Tips, Tricks & Tutorials)
![]() by the.killing.44 on Sun Jun 21, 2009 2:04 pm
by the.killing.44 on Sun Jun 21, 2009 2:04 pm
ManBungalow wrote:captainwalrus wrote:does anyone have a good tutorial for mountains in GIMP?
I was about to ask the same question.
viewtopic.php?f=127&t=73566&start=15#p1316716
Part 8.
.44
-
the.killing.44
- Posts: 4724
- Joined: Thu Oct 23, 2008 7:43 pm
- Location: now tell me what got two gums and knows how to spit rhymes
Re: Map-Making TTT (Tips, Tricks & Tutorials)
![]() by wcaclimbing on Sun Jun 21, 2009 2:11 pm
by wcaclimbing on Sun Jun 21, 2009 2:11 pm
Just posting something I wrote out for Bryguy a few days ago.
wcaclimbing wrote:how to make realistic terrain (Oasis, Winter):
1. put all your terrain color on one layer. No textures, no shadows, no highlights, just green and brown and whatever colors you need to paint the land. Use different brushes and different opacities to get a good mix of color. Real terrain isn't just flat green. It has bits of brown and grey and black and tan and everything else. Get in just a bit of those colors and things will look much more realistic.
2. Add texture to your land using different textured layers above your terrain color layer. I've found that setting the layers to 'overlay' and using a very low opacity works well. But try out other settings also, you might find one that works better.
3. Use more overlay layers, paint in light/dark spots on that layer. The overlay will make it look more natural. make high parts of the terrain lighter, lower parts darker. Keep your brushes at low opacity so your highlights and shadows don't get too extreme as you paint them in. Build them up gradually with lots of low opacity strokes. An alternative to this would be to copy in different rock textures from your favorite stock image site (I like http://www.cgtextures.com/). Set those to overlay. Just don't over-do it or you'll have a mess of texture that doesn't look real.
4. add water in another layer above all your terrain and texture layers. Use more overlays to make believable slopes down to the water.
These are the most extreme basics. This will give you a good base to work with, but its up to the artist to make it look good.
just remember: DO NOT use built-in filters and effects to make your land look like it has hills and textures in it. That just makes it come out looking fake and too perfect to be real. Stick to overlaying texture images and painting by hand and things will look much more believable. The only exception to this rule is the 'Sandstone' option in the photoshop 'texturizer' filter. That one works well. But be sure to add your own stuff to it. Sandstone looks very boring by itself.

-
wcaclimbing
- Posts: 5598
- Joined: Fri May 12, 2006 10:09 pm
- Location: In your quantum box....Maybe.


Re: Map-Making TTT (Tips, Tricks & Tutorials)
![]() by captainwalrus on Sun Jun 21, 2009 8:42 pm
by captainwalrus on Sun Jun 21, 2009 8:42 pm
Thanks, that is great.
-
captainwalrus
- Posts: 1018
- Joined: Sun Nov 11, 2007 3:19 pm
- Location: Finnmark
Re: Map-Making TTT (Tips, Tricks & Tutorials)
![]() by bryguy on Sun Jun 21, 2009 9:12 pm
by bryguy on Sun Jun 21, 2009 9:12 pm
the.killing.44 wrote:ManBungalow wrote:captainwalrus wrote:does anyone have a good tutorial for mountains in GIMP?
I was about to ask the same question.
viewtopic.php?f=127&t=73566&start=15#p1316716
Part 8.
.44
lol That ones terrible... I hardly knew anything for GIMP when I made that... Maybe I'll make a revision soon (:
Here are some that I've found on the Cartographers Guild site. You may need to create an account to view all the resources in the tutorial (Pictures for example)
http://forum.cartographersguild.com/sho ... tains+gimp
http://forum.cartographersguild.com/sho ... tains+gimp
http://forum.cartographersguild.com/sho ... tains+gimp
http://forum.cartographersguild.com/sho ... tains+gimp
http://forum.cartographersguild.com/sho ... tains+gimp
http://forum.cartographersguild.com/sho ... tains+gimp
http://forum.cartographersguild.com/sho ... tains+gimp
http://forum.cartographersguild.com/sho ... tains+gimp
http://forum.cartographersguild.com/sho ... tains+gimp
-
bryguy
- Posts: 4381
- Joined: Tue Aug 07, 2007 8:50 am
- Location: Lost in a Jigsaw
Re: Map-Making TTT (Tips, Tricks & Tutorials)
![]() by bryguy on Sun Jun 21, 2009 9:13 pm
by bryguy on Sun Jun 21, 2009 9:13 pm
wcaclimbing wrote:Just posting something I wrote out for Bryguy a few days ago.wcaclimbing wrote:how to make realistic terrain (Oasis, Winter):
1. put all your terrain color on one layer. No textures, no shadows, no highlights, just green and brown and whatever colors you need to paint the land. Use different brushes and different opacities to get a good mix of color. Real terrain isn't just flat green. It has bits of brown and grey and black and tan and everything else. Get in just a bit of those colors and things will look much more realistic.
2. Add texture to your land using different textured layers above your terrain color layer. I've found that setting the layers to 'overlay' and using a very low opacity works well. But try out other settings also, you might find one that works better.
3. Use more overlay layers, paint in light/dark spots on that layer. The overlay will make it look more natural. make high parts of the terrain lighter, lower parts darker. Keep your brushes at low opacity so your highlights and shadows don't get too extreme as you paint them in. Build them up gradually with lots of low opacity strokes. An alternative to this would be to copy in different rock textures from your favorite stock image site (I like http://www.cgtextures.com/). Set those to overlay. Just don't over-do it or you'll have a mess of texture that doesn't look real.
4. add water in another layer above all your terrain and texture layers. Use more overlays to make believable slopes down to the water.
These are the most extreme basics. This will give you a good base to work with, but its up to the artist to make it look good.
just remember: DO NOT use built-in filters and effects to make your land look like it has hills and textures in it. That just makes it come out looking fake and too perfect to be real. Stick to overlaying texture images and painting by hand and things will look much more believable. The only exception to this rule is the 'Sandstone' option in the photoshop 'texturizer' filter. That one works well. But be sure to add your own stuff to it. Sandstone looks very boring by itself.
Oh hey I remember that. lol Haven't had time to really try it yet (Btw thanks for it (: )
Do you think you might be able to make a quick tutorial with pictures? That might help some members.
-
bryguy
- Posts: 4381
- Joined: Tue Aug 07, 2007 8:50 am
- Location: Lost in a Jigsaw
Re: Map-Making TTT (Tips, Tricks & Tutorials)
![]() by bryguy on Sun Jun 21, 2009 10:07 pm
by bryguy on Sun Jun 21, 2009 10:07 pm
Something I've noticed said about GIMP is that its not as good as photoshop: Missing key filters, Layer effects, etc etc etc.... well I've been getting around lately (lol If you looked for me you could probably find me across about a dozen+ places around the internet) and I've discovered that, while GIMP can't possibly work as well as Photoshop, it can get pretty dang close if you have the right things. Here are some things that will help.
First off, I suggest reading This Article by Blair Mathis at the Smashing Magazine site (If you don't feel like reading it, don't worry, parts of it may be quoted in this post). He has 8 things that will help greatly, but depending on what you do, it may or may not help as much.
After reading that (If you decide to), I suggest that you download the following:
*Pspi.exe (Linux and Windows only. No Mac compatible version yet. Homesite is here)
*Download the GIMP Layer Effects Plugin
*Add Photoshop Brushes
Those two things can greatly help you with making GIMP work closer to that of Photoshop.
Here is what the earlier reffered to Smashing Magazine article says about the Pspi.exe filter:
[quote=Blair Mathis' Article]The PSPI plug-in allows GIMP to use Photoshop plug-ins. This increases the number of filters available to GIMP and allows Photoshop users to not have to sacrifice their library. If an equivalent GIMP plug-in can’t be found, assembling a kit of Photoshop filters is an potential option.
To start, download the PSPI plug-in from Gimp.org
In the program folder, copy and paste the entire contents of the PSPI plug-in download into the Plug-ins folder. If you’re running Linux, make sure you copy both the PSPI plug-in and the PSPI.exe, or it will not work.
Restart GIMP and open the Filters menu. At the bottom, you will see a new entry: “Photopshop Filters Plug-In Settings.” Select that to open the Photoshop dialog box, and point it to the folder where your Photoshop plug-ins are located. Add all future Photoshop plug-ins to that folder.
[/quote]
After downloading, I highly recommend you go to This site. It contains many of the Photoshop filters in .8bf form, which is great, as this gives you many of those missing filters. Also, if you look around you can find various other filters that you can use. Just make sure they are in .8bf form
Receiving an error about missing Plugin.dll? They have that also. Just download it and move it to the correct folder (Google it to learn how), and your problems should be fixed (:
Next, you should download the GIMP Layer Effects Plugin. This plugin gives you the same sort of effects as photoshop layers. Its a bit more work, but at least you'll now have those layer effects you've always wanted (:
Heres what the Smashing Magazine article says about the Layer Effects Plugin:
[quote=Blair Mathis' Article]Layer Styles are a beloved feature of many Photoshop users, and living without them can be a difficult adjustment. Layer Styles are called Layer Effects in GIMP and include: Drop Shadow, Inner Glow, Outer Glow, Gradient Overlay, Stroke, Bevel and Emboss, etc. These can be used to quickly apply effects to your layer(s) without having to jump through hoops.
Download the Layer Effects GIMP plug-in from Gimp.org. There are two versions: Script-Fu and Python. The Python version allows for live previews of the effects; the Script-Fu version does not. No matter which version you choose, save the plug-in in GIMP’s Plug-in folder and restart the program.
If you download the Python version, Layer Effects will be added under Image > Layer > Layer Effects. The Script-Fu version will be listed under Script-Fu > Layer Effects.[/quote]
Another thing that you can do is download photoshop .abr brushes. Starting with GIMP 2.4 (Either 2.4 or 2.2, sorry, cannot remember currently) GIMP has the added ability to use photoshop brushes, as long as they are in the default .abr brush form. Now those additional brushes that you've always wanted can be yours!
Heres what that article says:
[quote=Blair Mathis' Article]GIMP comes with far too few brushes; and the ones that are there are small, basic and not all useful. If you’re planning to author graphics, you’ll need a new library of brushes to accomplish anything. Installing brushes in GIMP is as simple as copying the brush file into the Brush folder and restarting GIMP.
Brushes can be downloaded from numerous locations, depending on what you’re looking for. That said, an excellent repository of free brushes of all types — including grunge, fire, splatter, stone and more — is at Blendfu.
[/quote]
Additional brushes can be found around the web if you're willing to search. Some such sites that may contain brushes are Brusheezy and DeviantArt
Need photoshop patterns? Download the Photoshop Pattern Loader (Linux/Windows) for GIMP. This script allows GIMP to open any photoshop patterns that are in .pat form. You will just need to save each pattern individually (One layer per pattern) to your patterns folder.
Seen a good photoshop gradient that you couldn't take your eye off of, or just wanted to make your own? Well, if your up to a bit of work, all you have to do is follow This Tutorial. It explains how to make that gradient that you've been eyeing, and even though its not specifically for how to make gradients in GIMP, it can help with that also.
Want some filters that were made for GIMP? I suggest downloading the Fx Foundry set. It has many various filters that may or may not be what you need. Otherwise, check out the GIMP Plugin Registry. They have many various plugins and scripts that that may be what you need.
-
bryguy
- Posts: 4381
- Joined: Tue Aug 07, 2007 8:50 am
- Location: Lost in a Jigsaw
47 posts
• Page 1 of 2 • 1, 2
Who is online
Users browsing this forum: No registered users
|
|||||||
| Conquer Club is not associated with RISK online in any way. Copyright © 2006-2025 by Big Wham LLC | |||||||