City Mogul Walk-through. Got Farm?
Moderator: Community Team
32 posts
• Page 1 of 2 • 1, 2
Re: city mongul
![]() by MOBAJOBG on Wed Oct 01, 2008 9:31 pm
by MOBAJOBG on Wed Oct 01, 2008 9:31 pm
First of all, the correct spelling of this "City Mogul" map is of prime importance else the map author would flip up.
Other than that, try to find an S territory which you can fortify all your armies onto while connecting most of your territories to it in a 1vs1 standard unlimited FoW game setting..
Other than that, try to find an S territory which you can fortify all your armies onto while connecting most of your territories to it in a 1vs1 standard unlimited FoW game setting..
-

 MOBAJOBG
- Posts: 748
- Joined: Thu Dec 14, 2006 12:18 am


Re: city mongul
![]() by msurules44 on Thu Oct 09, 2008 7:44 pm
by msurules44 on Thu Oct 09, 2008 7:44 pm
well i try to take the mall and the other place
-

msurules44
- Posts: 9
- Joined: Sun Jun 10, 2007 7:12 pm
- Location: ur moms house


Re: city mongul
![]() by pookey on Sat Oct 11, 2008 10:25 am
by pookey on Sat Oct 11, 2008 10:25 am
msurules44 wrote:well i try to take the mall and the other place
Wait a minute....
You have finished two game on this map and you lost both of them, so i don't really think you can give much of an accurate statement on how to win a game on this map.
And i only really think trying to conquer the mall and manor works in low player games such as 1v1 or 1v1v1, in an eight player game your main starting point should be trying to conquer all of the blocks in your territory, and then take one player out, secure position, take out another, secure position and so on until you either get a clear chance to take the mall and manor. Although that is a brief guide on how to start from someone who has played few games on the map.
-
pookey
- Posts: 107
- Joined: Thu Mar 29, 2007 11:13 am


Re: city mongul
![]() by Lhuth on Sat Oct 11, 2008 10:28 am
by Lhuth on Sat Oct 11, 2008 10:28 am
Yeah, I've played a few (maybe 10ish) games on this map so far, with decent enough success, and have seen some others, and haven't seen any ending by the capture of the mall. Most end before that stage. If you have enough men to take and hold the mall against your opponents, then chances are you have enough to take out your opponents, which is a far safer strategy on the whole.
-
Lhuth
- Posts: 50
- Joined: Mon Mar 12, 2007 7:55 am


Re: city mongul
![]() by Zemljanin on Mon Oct 13, 2008 8:28 pm
by Zemljanin on Mon Oct 13, 2008 8:28 pm
Wait the minute! Do you have to keep Mall and CC Manor for one round - or is it enough to just conquer them?
The lowest rank: Question Mark
The lowest score: 1000
The lowest place on the scoreboard: don't remember
The lowest score: 1000
The lowest place on the scoreboard: don't remember
-

Zemljanin
- Posts: 585
- Joined: Sun Aug 12, 2007 5:27 am


 2
2


Re: city mongul
![]() by The Neon Peon on Mon Oct 13, 2008 8:38 pm
by The Neon Peon on Mon Oct 13, 2008 8:38 pm
Zemljanin wrote:Wait the minute! Do you have to keep Mall and CC Manor for one round - or is it enough to just conquer them?
You have to have them at the start of your turn.
Edit: at least that is how it works in AoR, Feudal etc.
-

The Neon Peon
- Posts: 2342
- Joined: Sat Jun 14, 2008 12:49 pm


Re: city mongul
![]() by daydream on Thu Oct 16, 2008 2:56 pm
by daydream on Thu Oct 16, 2008 2:56 pm
MOBAJOBG wrote:First of all, the correct spelling of this "City Mogul" map is of prime importance else the map author would flip up.
Other than that, try to find an S territory which you can fortify all your armies onto while connecting most of your territories to it in a 1vs1 standard unlimited FoW game setting..
this has worked for me so far.

-

daydream
- Posts: 922
- Joined: Sun Mar 04, 2007 9:02 am
- Location: Germany


Re: city mongul
![]() by Zemljanin on Thu Oct 16, 2008 8:43 pm
by Zemljanin on Thu Oct 16, 2008 8:43 pm
The Neon Peon wrote:Zemljanin wrote:Wait the minute! Do you have to keep Mall and CC Manor for one round - or is it enough to just conquer them?
You have to have them at the start of your turn.
I guessed so, but then some posts didn't have much sense...
The lowest rank: Question Mark
The lowest score: 1000
The lowest place on the scoreboard: don't remember
The lowest score: 1000
The lowest place on the scoreboard: don't remember
-
Zemljanin
- Posts: 585
- Joined: Sun Aug 12, 2007 5:27 am
2
City Mogul Walk-through. Got Farm?
![]() by MaleAlphaThree on Mon May 11, 2009 12:38 pm
by MaleAlphaThree on Mon May 11, 2009 12:38 pm
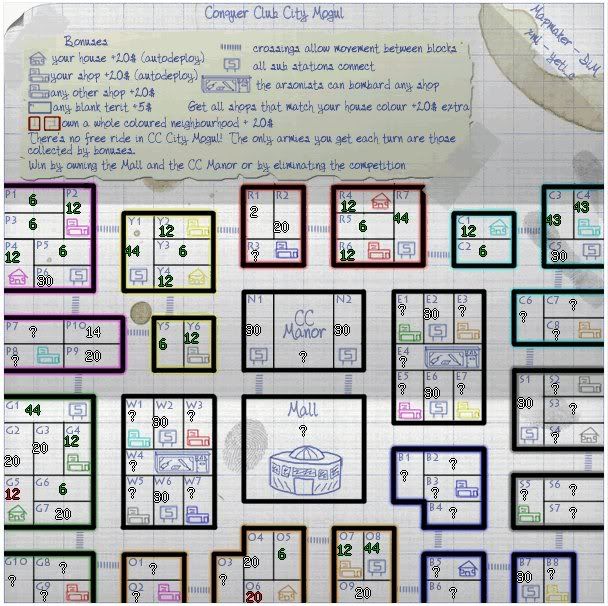
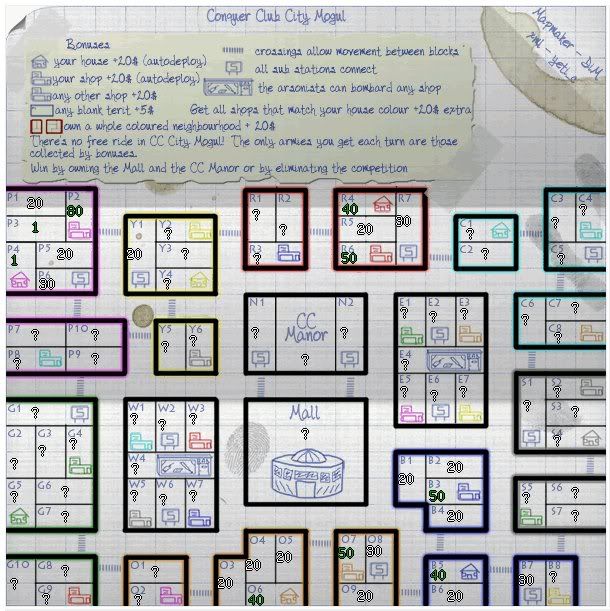
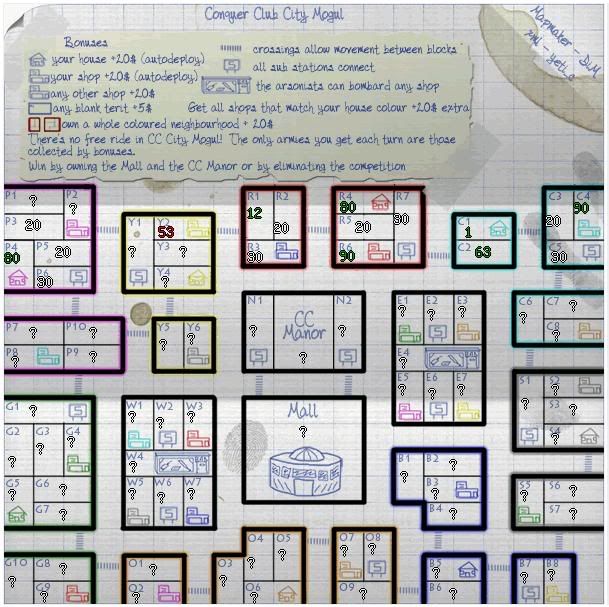
A thread specifically for learning how to play on the City Mogul map. I'll provide pics of my game, and my thoughts as I go along. This is not only to motivate me to analyze the map as I learn it, but for everyone that's interested to know how the map works (hopefully before they have to play it). You will also get an inside look at my basic strategic thinking (in this situation). It is an interesting map with the bonuses etc. I kind of like the look of it. 
Fun fact: I was paranoid of out my mind when I started playing this. By the end, it was like "whatev". You'll see.
Here's a walk-through of my first game: Game 4764207
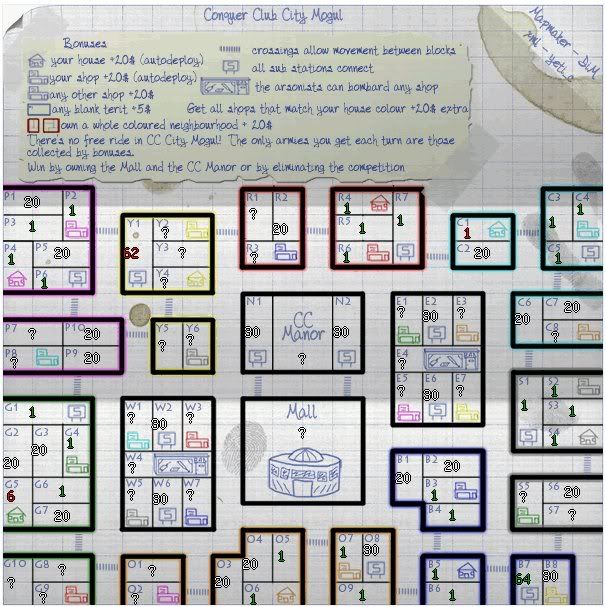
Beginning drop:
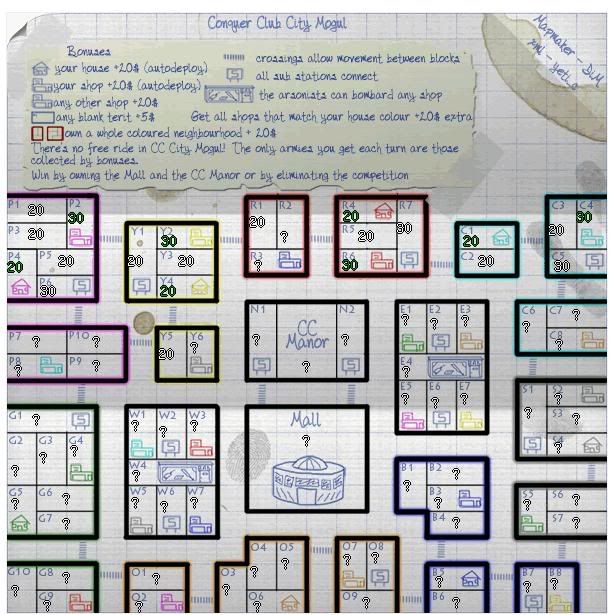
I get 20 on EVERY House and Shop that I own, auto-deployed. Blank territories start with 20 neutral, Houses/Shops start with 30 (except players get 20 on Houses). From what I've heard, Arsonists/Manor/Mall start with 40 or something. Taking the Manor and Mall, and keeping it until your next turn, gives you a win.
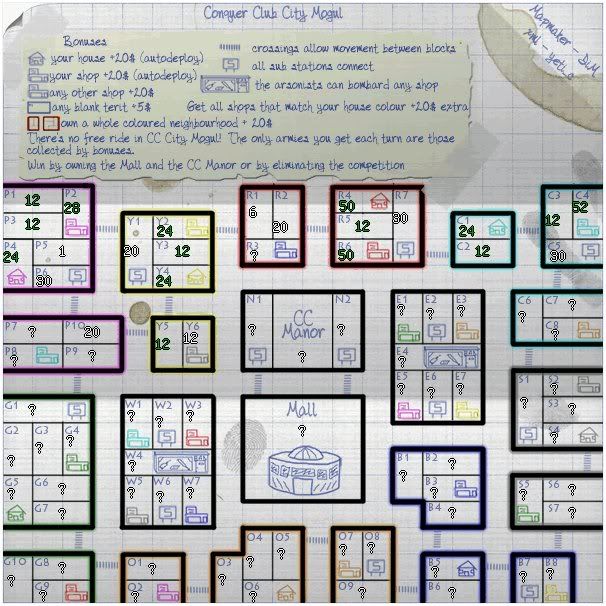
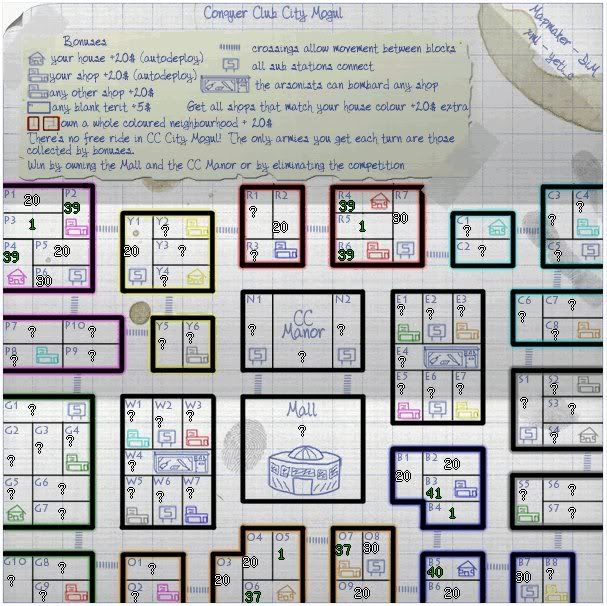
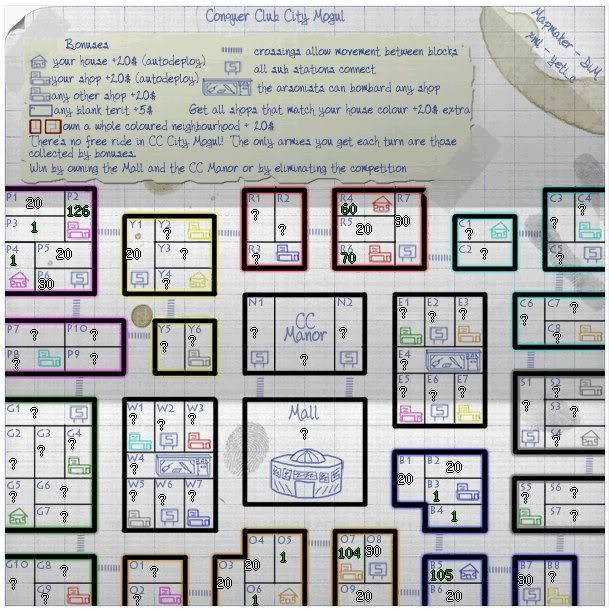
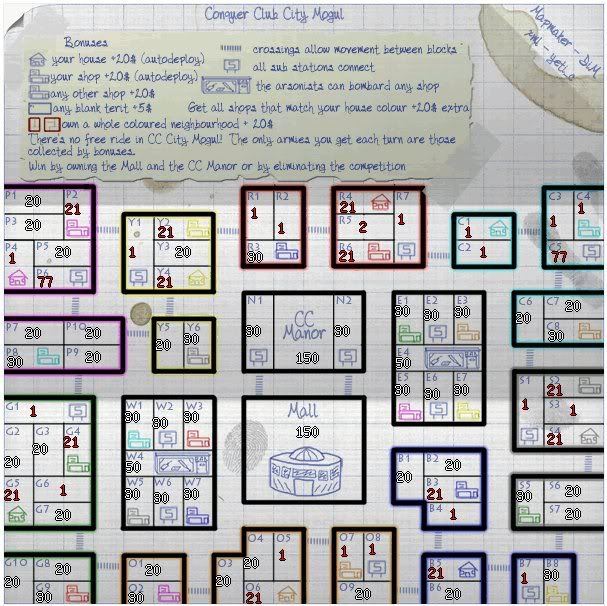
After Round 1:

I wanted to keep blanks with 12 and Houses/Shops with 24, because those are nice round numbers to make sure that no territ is free to take, in case my defenses fail to hold back a bullrush. After all, each territory is worth a pretty bonus, and there are going to be plenty of armies to go around, in time.
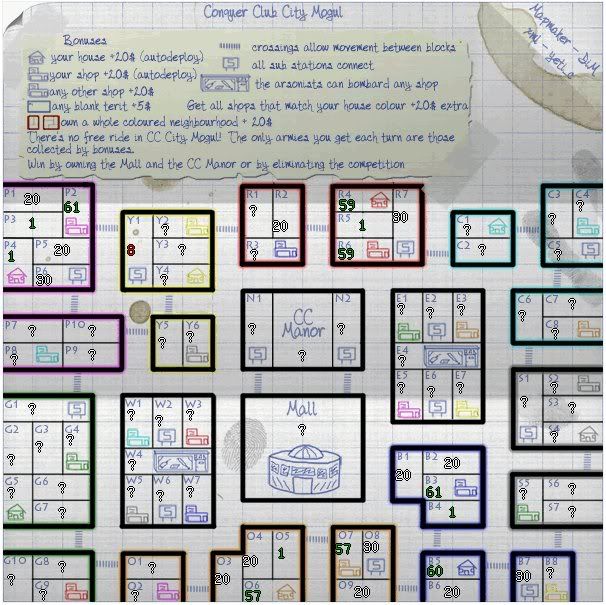
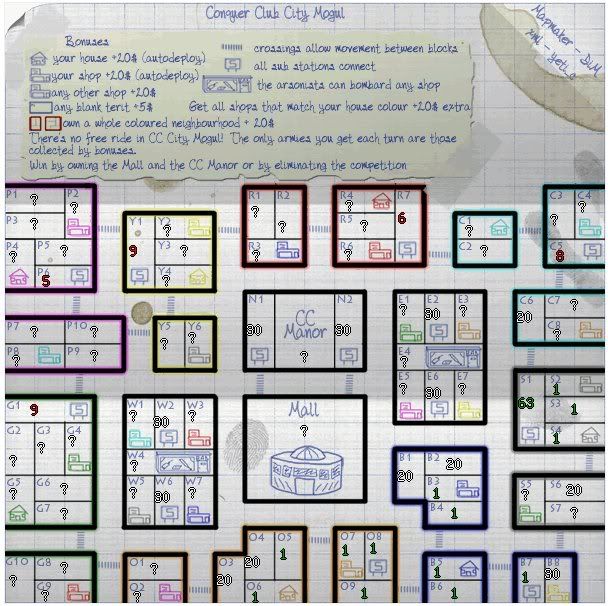
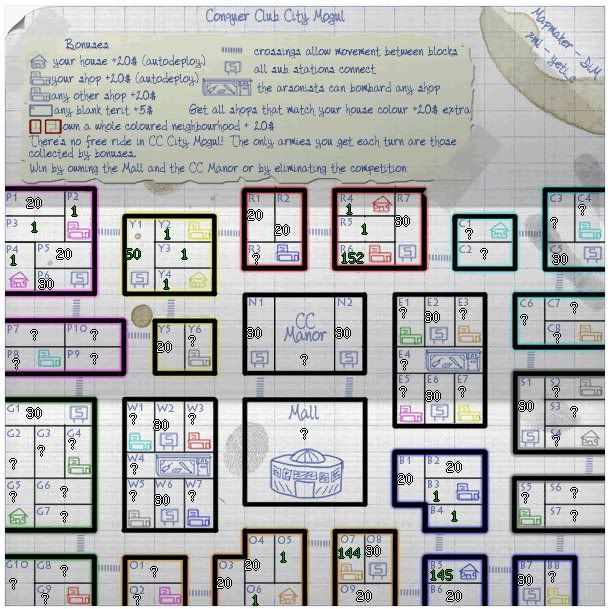
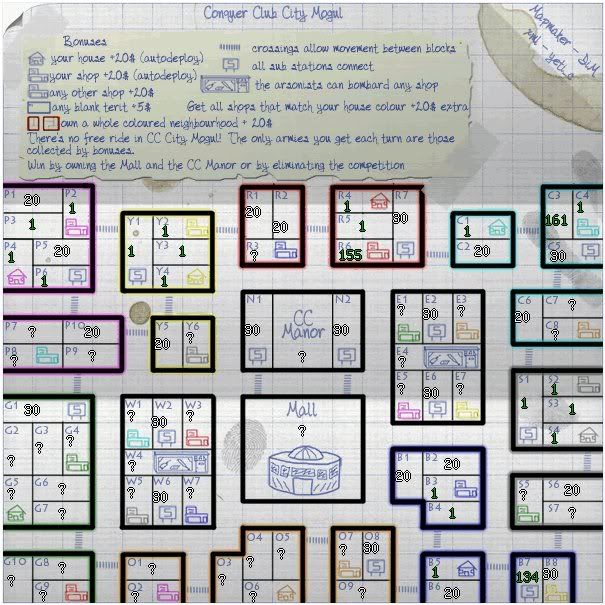
After Round 2:
Just to make sure it is stated, the opponent started with Green, Orange, Blue, and Black Houses/Shops. I did get a little lucky with my drop because I can gain all Teal colored shops without having to directly fight him for one. The last Teal is in one of the two neutral blocks.
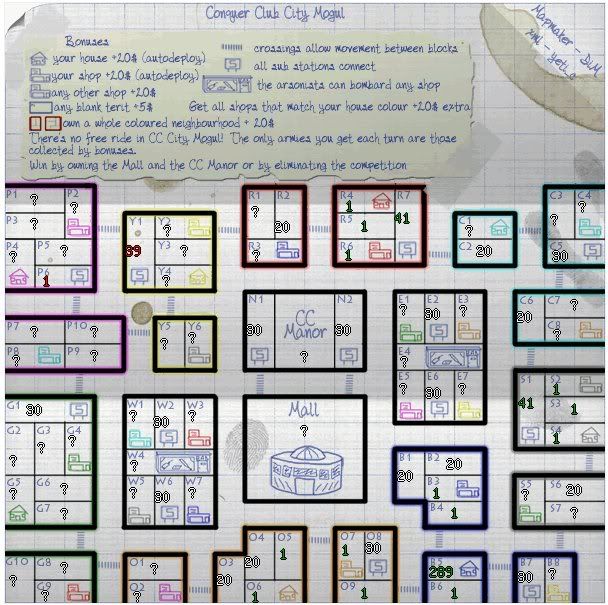
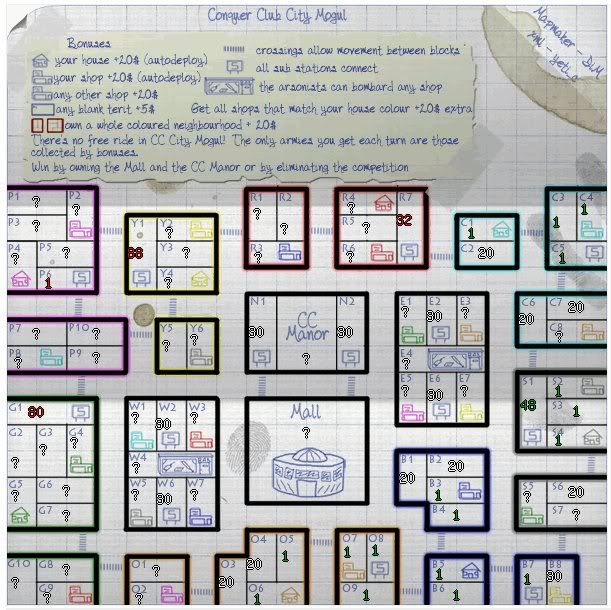
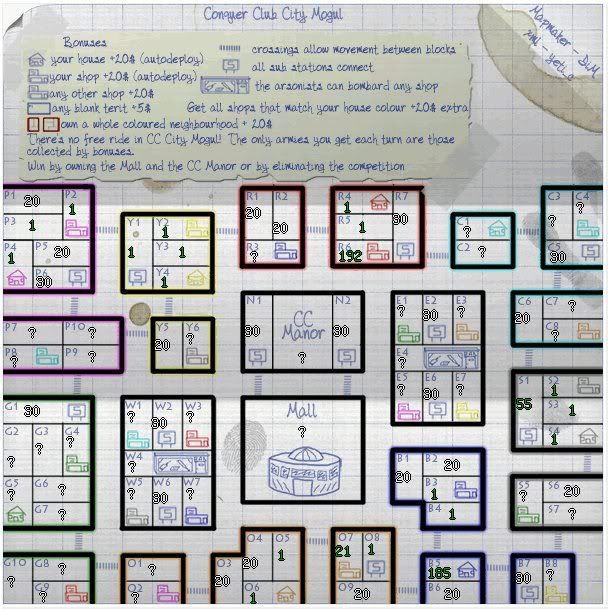
After Round 3:
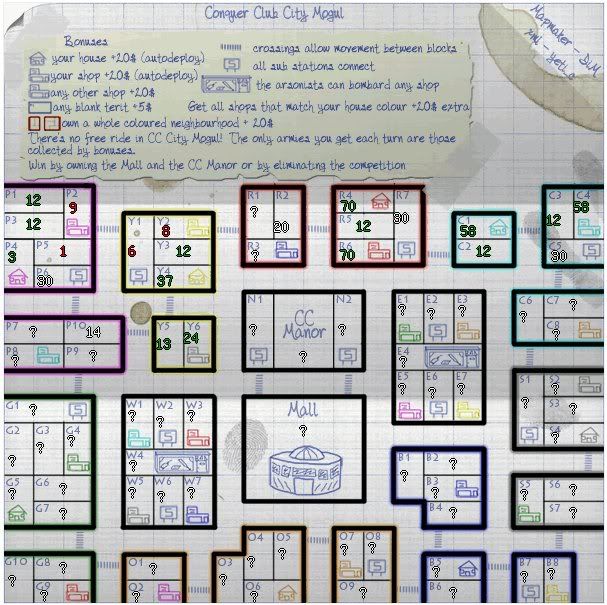
That bastard farmed me. Recoverable damage? Probably not.
Well, maybe.... I don't know. I hope he is extremely weak from attacking me, though.
After TURN 4:

OK, so he was a little weak from that attack. Apparently, my defensive "No Territ. Left Behind Act" worked as I had hoped, and threw him for a loop. It seems that his strategy has been: hoard up an assload of armies (100+) and then throw that assload of armies into a perceived weak point so as to f*ck up the enemy irreparably. His tactic probably worked, unfortunately, but at least he had to pay my toll. I is guud..... for now.
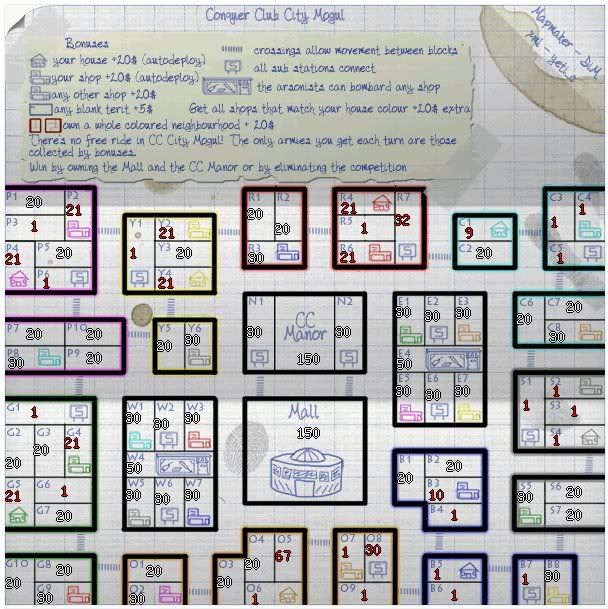
After Round 4:
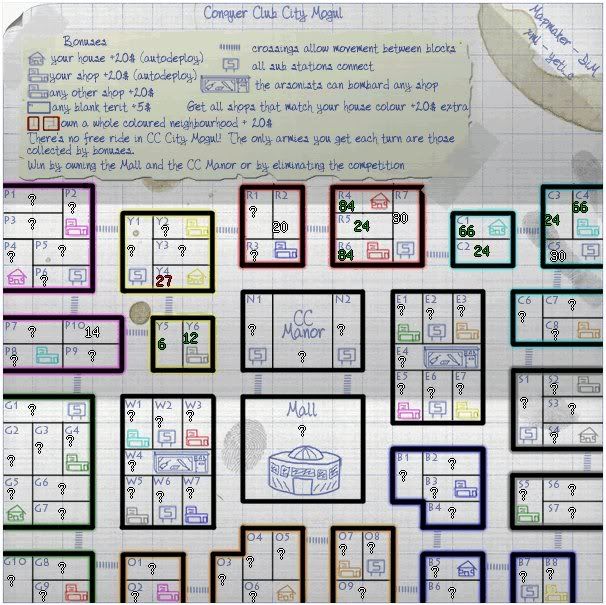
Yeah, his tactic is working alright. I should have tried that? I had thought of that tactic, but figured it had a decent chance of failure. I guess that is not the case when it comes to effectiveness against my "slow but steady" routine.... maybe I was too steady and not enough slow?
After TURN 5:
I name this piece, "Attempt at Recovery Deux". I was in a real desperate mood during the creation of this piece, and I think you can see that in the subtle nuances, here and there. Spent a lot of time on it. Too much time, some would say.
After Round 5:

Guess it was kind of a close game. My defended territories putting up a fight helped keep his conquering forces in check, but it wasn't nearly enough to survive. Whatev. I suppose what you really need to do to survive is to only take one territory per round (or less, maybe one every second round). It's a weirdo map.... maybe. I did enjoy playing it, either way.
I hope everyone will learn something from this and beware of 1v1 foggy unlimited games on City Mogul. Getting farmed is never fun. Four player is probably fun, and eight players must be totally crazy. Good luck out there.
Fun fact: I was paranoid of out my mind when I started playing this. By the end, it was like "whatev". You'll see.
Here's a walk-through of my first game: Game 4764207
Beginning drop:
I get 20 on EVERY House and Shop that I own, auto-deployed. Blank territories start with 20 neutral, Houses/Shops start with 30 (except players get 20 on Houses). From what I've heard, Arsonists/Manor/Mall start with 40 or something. Taking the Manor and Mall, and keeping it until your next turn, gives you a win.
After Round 1:
I wanted to keep blanks with 12 and Houses/Shops with 24, because those are nice round numbers to make sure that no territ is free to take, in case my defenses fail to hold back a bullrush. After all, each territory is worth a pretty bonus, and there are going to be plenty of armies to go around, in time.
After Round 2:
Just to make sure it is stated, the opponent started with Green, Orange, Blue, and Black Houses/Shops. I did get a little lucky with my drop because I can gain all Teal colored shops without having to directly fight him for one. The last Teal is in one of the two neutral blocks.
After Round 3:
That bastard farmed me. Recoverable damage? Probably not.
Well, maybe.... I don't know. I hope he is extremely weak from attacking me, though.
After TURN 4:
OK, so he was a little weak from that attack. Apparently, my defensive "No Territ. Left Behind Act" worked as I had hoped, and threw him for a loop. It seems that his strategy has been: hoard up an assload of armies (100+) and then throw that assload of armies into a perceived weak point so as to f*ck up the enemy irreparably. His tactic probably worked, unfortunately, but at least he had to pay my toll. I is guud..... for now.
After Round 4:
Yeah, his tactic is working alright. I should have tried that? I had thought of that tactic, but figured it had a decent chance of failure. I guess that is not the case when it comes to effectiveness against my "slow but steady" routine.... maybe I was too steady and not enough slow?
After TURN 5:
I name this piece, "Attempt at Recovery Deux". I was in a real desperate mood during the creation of this piece, and I think you can see that in the subtle nuances, here and there. Spent a lot of time on it. Too much time, some would say.
After Round 5:
Guess it was kind of a close game. My defended territories putting up a fight helped keep his conquering forces in check, but it wasn't nearly enough to survive. Whatev. I suppose what you really need to do to survive is to only take one territory per round (or less, maybe one every second round). It's a weirdo map.... maybe. I did enjoy playing it, either way.
I hope everyone will learn something from this and beware of 1v1 foggy unlimited games on City Mogul. Getting farmed is never fun. Four player is probably fun, and eight players must be totally crazy. Good luck out there.

-

MaleAlphaThree
- Posts: 35
- Joined: Sun Jun 01, 2008 2:52 pm
- Location: Video games.


Re: City Mogul Walk-through. Got Farm?
![]() by MaleAlphaThree on Mon May 11, 2009 12:38 pm
by MaleAlphaThree on Mon May 11, 2009 12:38 pm
OK, here is Game 2!
Knowing that I have to play four more of these abominations against this guy gave me just enough motivation to want to learn how to win this nastiness, two days ago. I considered not posting pics, but then I remembered that EVERYONE would enjoy a demonstration of my getting an ass kicking. I'm going to attempt to reformulate my strategy, I might fail at that, but at least I'll get eliminated as quickly enough.
Game 4764209
After TURN 1:
This time, I only attacked Blanks that were bordered by TWO of my starting points. That way, I can balance my overwhelming weakness across more than one territory, making myself.... harder to kill? OK, you caught me, I don't know what the hell I'm talking about. I just thought it would make me sound cool.
After TURN 2:
This time he didn't f*ck around. No fucking around going on here. Nope. Not here. No way. Look elsewhere for that stuff.
After Round 2:
Thought I would use his technique against him. Maybe that is the only way.... I opened that one Subway "door" as a bait for him to open up another one of his doors. Then I will rain down on him like a newbie fury!!!
After TURN 3:
Well, my fight fire with fire idea worked out a little bit. It probably won't hold, but I gave him a run for his money.... maybe.
After TURN 4:
Yep, if I had taken those two bonuses, I probably would have won. Epik Phail.
At least I'm getting better!
After TURN 5:
OK, now he's just wasting time for both of us. Next game, please!
After Round 5:
Stick a fork in it, cause it's done.
-
MaleAlphaThree
- Posts: 35
- Joined: Sun Jun 01, 2008 2:52 pm
- Location: Video games.
Re: City Mogul Walk-through. Got Farm?
![]() by MaleAlphaThree on Mon May 11, 2009 12:39 pm
by MaleAlphaThree on Mon May 11, 2009 12:39 pm
Game 3: GO!
Game 4764211
Well, I think I've got the strategy gist of this map now. I always knew that attacking neutrals weakens you on two sides (on one: you're consuming armies, on two: you're opening up a territory to attack from enemies WHILE you're consuming armies), but until you take that fact seriously, you won't get anywhere. Definitely not on a map like this: packed full of neutrals.
After TURN 1:
OK, now I took my own advice (finally), and only grabbed a single territory. Except this time, I'm going to try going on the offensive.
After TURN 2:
I like to think of each pair of Houses/Shops as a chamber in a revolver. Anyone watching the logs can tell how many you have loaded (taking a neutral, and reinforcing), and you can only do so much damage with a single "bullet". But the longer you wait, the stronger each bullet gets. As long as you keep track of how strong everyone's bullets are, and how many there are, you should know when/if someone is going to get eliminated, and when the best opportunity for you to attack is. You should also be able to expect counter-attacks, and how much damage you'll take.
After TURN 3:
It's on. It's FUCKING ON.
After TURN 4:
What a lame map. So this is how it's played all the time? No wonder it's a farming map. BOR-ING. Whoever made this map should be ashamed; you don't pack a map full of neutrals AND pump every player into next week with all the bonuses in the world! Where's the strategy? Where's the "not knowing what someone might do next" excitement? It's six feet under ground, that's where.
After TURN 5:

OK, I'm satisfied with this map. Too bad I have to play two more. After this though, I'm done with it. You know what.... they could easily reduce all of the army sizes and get the same effect for gameplay, without having to pad the numbers to make people feel big. Houses/Blanks could start with 4, Shops with 6, Arsonists with 10, and Manor/Mall with 30. Then the bonuses would be 4 (autodeploys and other bonuses), with Blanks only giving +1 each. The game would change with card games, and maybe make it less of a farming map. I would probably enjoy that map just a little bit more, but then I'm a Minimalist, so I like that kind of thing.
Most important thing about firing your "bullets" is knowing when/how to aim them. If I hadn't attacked just right, then he would have had a couple bonuses leftover (he left a few behind as insurance), along with a handful of armies that I might not have been able to reach. You can run into this problem on pretty much any map if you don't attack/advance correctly to compensate for possible army placements ahead. At best, screwing up with delay the game a few more rounds when it should have ended (in your favor or theirs), at worst, you'll totally ruin yourself and lose like a bitch, see Game 2.
I wonder if anyone is actually lame enough to hold build games on this thing? Insane.
Game 4764211
Well, I think I've got the strategy gist of this map now. I always knew that attacking neutrals weakens you on two sides (on one: you're consuming armies, on two: you're opening up a territory to attack from enemies WHILE you're consuming armies), but until you take that fact seriously, you won't get anywhere. Definitely not on a map like this: packed full of neutrals.
After TURN 1:
OK, now I took my own advice (finally), and only grabbed a single territory. Except this time, I'm going to try going on the offensive.
After TURN 2:
I like to think of each pair of Houses/Shops as a chamber in a revolver. Anyone watching the logs can tell how many you have loaded (taking a neutral, and reinforcing), and you can only do so much damage with a single "bullet". But the longer you wait, the stronger each bullet gets. As long as you keep track of how strong everyone's bullets are, and how many there are, you should know when/if someone is going to get eliminated, and when the best opportunity for you to attack is. You should also be able to expect counter-attacks, and how much damage you'll take.
After TURN 3:
It's on. It's FUCKING ON.
After TURN 4:
What a lame map. So this is how it's played all the time? No wonder it's a farming map. BOR-ING. Whoever made this map should be ashamed; you don't pack a map full of neutrals AND pump every player into next week with all the bonuses in the world! Where's the strategy? Where's the "not knowing what someone might do next" excitement? It's six feet under ground, that's where.
After TURN 5:
OK, I'm satisfied with this map. Too bad I have to play two more. After this though, I'm done with it. You know what.... they could easily reduce all of the army sizes and get the same effect for gameplay, without having to pad the numbers to make people feel big. Houses/Blanks could start with 4, Shops with 6, Arsonists with 10, and Manor/Mall with 30. Then the bonuses would be 4 (autodeploys and other bonuses), with Blanks only giving +1 each. The game would change with card games, and maybe make it less of a farming map. I would probably enjoy that map just a little bit more, but then I'm a Minimalist, so I like that kind of thing.
Most important thing about firing your "bullets" is knowing when/how to aim them. If I hadn't attacked just right, then he would have had a couple bonuses leftover (he left a few behind as insurance), along with a handful of armies that I might not have been able to reach. You can run into this problem on pretty much any map if you don't attack/advance correctly to compensate for possible army placements ahead. At best, screwing up with delay the game a few more rounds when it should have ended (in your favor or theirs), at worst, you'll totally ruin yourself and lose like a bitch, see Game 2.
I wonder if anyone is actually lame enough to hold build games on this thing? Insane.
-
MaleAlphaThree
- Posts: 35
- Joined: Sun Jun 01, 2008 2:52 pm
- Location: Video games.
Re: City Mogul Walk-through. Got Farm?
![]() by MaleAlphaThree on Mon May 11, 2009 12:40 pm
by MaleAlphaThree on Mon May 11, 2009 12:40 pm
Game 4: Deja Vu. Again.
Game 4764212
Second chance at my first game, basically. Except, I know what's going on, and my opponent knows that I know what's going on. He also probably knows that I know that he knows that I know what's going on. Not that it would make much of a difference.
After TURN 1:

OK, I kinda fucked up here. But maybe in a good way. I meant to attack and conquer C3 instead of C2, because that is the only point that I can do that without weakening myself (much). But instead I weakened myself a handful by opening up that "wall" I had there. Maybe he won't be expecting that and it will help me in some connecting way. I hope??
After TURN 2:

Decided to try something different. Considering the circumstances.
After TURN 3:
OK, I fucked myself. Bah humbug.
After TURN 4:

It's crazy. But the best thing I can do is not attack in this situation. Because it will draw the game out a couple more rounds before he wins. Yayz.
After Round 4:
Did NOT expect that. Sarcasm tastes so sweet, sometimes. One more tooth to get pulled.... let's see how it goes.
Game 4764212
Second chance at my first game, basically. Except, I know what's going on, and my opponent knows that I know what's going on. He also probably knows that I know that he knows that I know what's going on. Not that it would make much of a difference.
After TURN 1:
OK, I kinda fucked up here. But maybe in a good way. I meant to attack and conquer C3 instead of C2, because that is the only point that I can do that without weakening myself (much). But instead I weakened myself a handful by opening up that "wall" I had there. Maybe he won't be expecting that and it will help me in some connecting way. I hope??
After TURN 2:
Decided to try something different. Considering the circumstances.
After TURN 3:
OK, I fucked myself. Bah humbug.
After TURN 4:
It's crazy. But the best thing I can do is not attack in this situation. Because it will draw the game out a couple more rounds before he wins. Yayz.
After Round 4:
Did NOT expect that. Sarcasm tastes so sweet, sometimes. One more tooth to get pulled.... let's see how it goes.
-
MaleAlphaThree
- Posts: 35
- Joined: Sun Jun 01, 2008 2:52 pm
- Location: Video games.
Re: City Mogul Walk-through. Got Farm?
![]() by MaleAlphaThree on Mon May 11, 2009 12:41 pm
by MaleAlphaThree on Mon May 11, 2009 12:41 pm
Game 5: Boredom Becomes Me
Game 4764213
At least I'm getting out all the urges to play singles on this map in my lifetime. Or any fat bonus map, for that matter.
After TURN 1:

Uh huh. Same drop for the third time. Awesome. Apparently, it's a good drop. Personally, I'm unsure about that.
After TURN 2:

You know, winning won't even give much satisfaction really. The first time I was just glad I understood how to even win. Now, it's just confirmation that this map plain sucks on 1v1.
After TURN 3:
Standard procedure. Nothing to see here. Move along.
After TURN 4:

Minimal feeling of accomplishment. Newb farmers must be the most bored people on CC. That's for sure.
Game 4764213
At least I'm getting out all the urges to play singles on this map in my lifetime. Or any fat bonus map, for that matter.
After TURN 1:
Uh huh. Same drop for the third time. Awesome. Apparently, it's a good drop. Personally, I'm unsure about that.
After TURN 2:
You know, winning won't even give much satisfaction really. The first time I was just glad I understood how to even win. Now, it's just confirmation that this map plain sucks on 1v1.
After TURN 3:
Standard procedure. Nothing to see here. Move along.
After TURN 4:
-
MaleAlphaThree
- Posts: 35
- Joined: Sun Jun 01, 2008 2:52 pm
- Location: Video games.
Re: City Mogul Walk-through. Got Farm?
![]() by Bob_1171st on Mon May 11, 2009 3:39 pm
by Bob_1171st on Mon May 11, 2009 3:39 pm
Considering that the term 'farming' isn't defined, nor is there a selection of opitions to counter that proposal. I don't believe that this thread is particularly fair in judging.
I would personally say, never having played that map, that I honestly don't know. Mindyou, I might guess that the term 'farming' applies to people who play matchs 1 vs 1 just to improve their own wins rating. Considering the way how a couple of games played out whereby nothing occured and the other player just left. I might draw that conclusion.
If indeed that is the case, then that is a flaw in the map that only one stratagem plays out to play the game without substancail time investment. Mindyou, that may only occur in a 1vs1 game and would have to be tested in other play formats, and if those game formats produce the same outcomes, and even if they are applicable to the term of 'farming', which they may or may not be.
I think that the conclusion I am assuming from your posts is good, and well researched. Yet at the same time I think that it also makes a presumtion about all games played, and what intent those players might have.
Eitherway it was an interesting read on a map tactic evaluation. +1 Karma
Bob
-

Bob_1171st
- Posts: 8
- Joined: Tue May 05, 2009 12:32 pm
Re: City Mogul Walk-through. Got Farm?
![]() by b00060 on Mon Jun 15, 2009 10:07 am
by b00060 on Mon Jun 15, 2009 10:07 am
Well this was not a farming situation at all, and was actually the result of a 5 game series in our clan tournament for our 1 on 1 individual maps.
-

b00060
- Posts: 4051
- Joined: Wed Nov 12, 2008 7:35 pm
- Location: Washington D.C.


 47
47

 32
32
Re: City Mogul Walk-through. Got Farm?
![]() by JOHNNYROCKET24 on Mon Jun 15, 2009 11:27 am
by JOHNNYROCKET24 on Mon Jun 15, 2009 11:27 am
heres the leet way that the scoreboard leaders play....we wont mention any names ...
freestyle only
round 1= deploy
round 2= begin turn with less than 1 hour. take objective to win game. let time run out
round3= start turn ( back to back turns )before your opponent plays and you won due to holding objective.
real effective when you can play at odd hours like 2:00 AM. Just set your alarm clock and the points are all yours !
JR's Game Profile
-

JOHNNYROCKET24
- Posts: 5514
- Joined: Mon May 08, 2006 4:11 am
- Location: among the leets


 52
52


City Mogul map question
![]() by KoolBak on Sat Sep 19, 2009 12:17 pm
by KoolBak on Sat Sep 19, 2009 12:17 pm
Wasn't sure if I should post here....or in Q & A....or in Strategy....?? lol
Anyhow...I am growing to like this map but have 1 question; the legend says one way to win is by "Owning CC Mall and Manor".
This implies to me that if you TAKE these territories, you win. What I am afraid of is that you may have to HOLD them for a round? It doesnt specify.....anyone know?? Thanks ;o)
Last edited by KoolBak on Sat Sep 19, 2009 12:49 pm, edited 1 time in total.
"Gypsy told my fortune...she said that nothin showed...."
Neil Young....Like An Inca
AND:
Neil Young....Like An Inca
AND:
riskllama wrote:Koolbak wins this thread.
-

KoolBak
- Posts: 7410
- Joined: Fri Feb 03, 2006 1:03 pm
- Location: The beautiful Pacific Northwest


Re: City Mogul map question
![]() by VampireM on Sat Sep 19, 2009 12:24 pm
by VampireM on Sat Sep 19, 2009 12:24 pm
anyone can correct me if im wrong, but as far as i know any map that u need to hold specfic regions to win, u will need to be holding those regions when u take ur next turn.. so to clarify, the game will be won when u start a turn holding those specfic regions.. in city mongal that means the mall and maonor..

-

VampireM
- Posts: 714
- Joined: Tue Aug 05, 2008 4:55 pm


Re: City Mogul map question
![]() by The Neon Peon on Sat Sep 19, 2009 12:25 pm
by The Neon Peon on Sat Sep 19, 2009 12:25 pm
You have to begin turn with both in your possession to win.
-
The Neon Peon
- Posts: 2342
- Joined: Sat Jun 14, 2008 12:49 pm
Re: City Mogul map question
![]() by KoolBak on Sat Sep 19, 2009 12:50 pm
by KoolBak on Sat Sep 19, 2009 12:50 pm
Thank you!
"Gypsy told my fortune...she said that nothin showed...."
Neil Young....Like An Inca
AND:
Neil Young....Like An Inca
AND:
riskllama wrote:Koolbak wins this thread.
-
KoolBak
- Posts: 7410
- Joined: Fri Feb 03, 2006 1:03 pm
- Location: The beautiful Pacific Northwest
Re: City Mogul map question
![]() by jonesthecurl on Mon Sep 21, 2009 2:23 pm
by jonesthecurl on Mon Sep 21, 2009 2:23 pm
...and I've seen people lose because they didn't know tht. I've done so myself on the Greek one where you have to hold all the shields.
("There", thinks the curly one, "I've won. I have all the shields. Never mind that it leaves me weak as a """" after a ****, I've won. Good job nobody gets another go though. Hey, hold on...")
("There", thinks the curly one, "I've won. I have all the shields. Never mind that it leaves me weak as a """" after a ****, I've won. Good job nobody gets another go though. Hey, hold on...")
instagram.com/garethjohnjoneswrites
-

jonesthecurl
- Posts: 4616
- Joined: Sun Mar 16, 2008 9:42 am
- Location: disused action figure warehouse


-

dhallmeyer
- Senior SoC Training Instructor

- Posts: 7750
- Joined: Thu Sep 04, 2008 2:47 pm
- Location: the un-nutty part of CA


Re: City Mogul
![]() by khazalid on Sun Nov 29, 2009 5:58 pm
by khazalid on Sun Nov 29, 2009 5:58 pm
if it is unlim, unite your armies in r1.
be wary of attacking substations and hunting too early.
remember that big stacks are less prone to fluctuations of luck than smaller ones.
be wary of attacking substations and hunting too early.
remember that big stacks are less prone to fluctuations of luck than smaller ones.
had i been wise, i would have seen that her simplicity cost her a fortune
-
khazalid
- Posts: 3413
- Joined: Thu Oct 26, 2006 5:39 am
- Location: scotland

Re: City Mogul
![]() by the.killing.44 on Sun Nov 29, 2009 6:06 pm
by the.killing.44 on Sun Nov 29, 2009 6:06 pm
khazalid wrote:if it is unlim, unite your armies in r1.
Lol no.
First round, attack the blanks that connect your house and shop and fort to one large stack. Y2, P2 (unless you are in Y as well—in that case, P4 is better), C4, S4, B5, O7, G4 are the ones you should fort to.
Rest of the rounds, just fort together. If it's large-player with cards, attack other territories in your neighborhood. Do NOT take stations unless you are of great strength and are going after someone.
-

the.killing.44
- Posts: 4724
- Joined: Thu Oct 23, 2008 7:43 pm
- Location: now tell me what got two gums and knows how to spit rhymes


32 posts
• Page 1 of 2 • 1, 2
Return to Conquer Club Discussion
Who is online
Users browsing this forum: No registered users
|
|||||||
| Conquer Club is not associated with RISK online in any way. Copyright © 2006-2025 by Big Wham LLC | |||||||